This article explains how to onboard Cloud BMS in the Remote Access portal. Our Cloud BMS offering provides a fully managed environment for Tridium Niagara, handling all cloud infrastructure, licensing, and software upgrades. Secure Link Nodes or Edge Nodes enable secure connectivity between the cloud and on-premises environments for remote access to building networks, controllers, and devices.
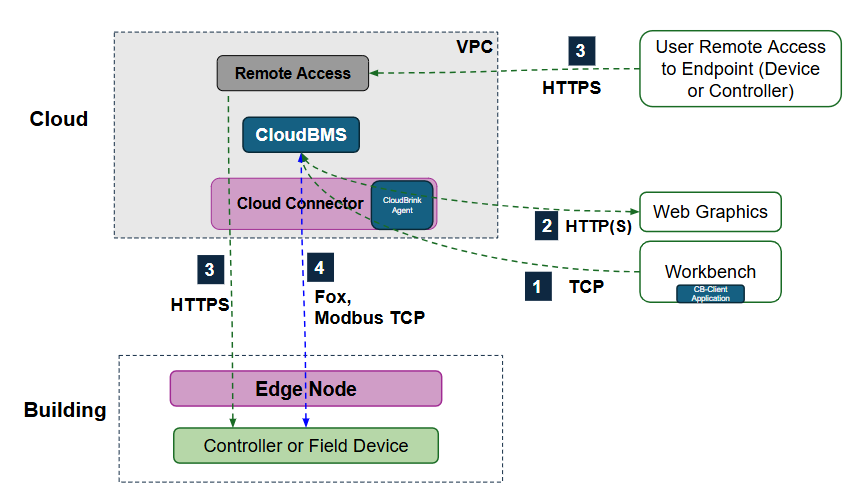
The following diagram gives an architectural overview of the Cloud BMS setup.
Prerequisites
Before beginning setup, confirm the following tasks are completed:
Your Edge Node is powered on and connected to the internet.
Your Edge Node has been onboarded to Neeve and shows an ALIVE status in the Neeve portal.
N4 Supervisor v4.14 or later has been deployed to your Neeve VPC environment.
You have installed Niagara Workbench 4.14 or later on your laptop/computer.
You have deployed a JACE or other controller/field device on the edge to communicate with the N4 Supervisor using the Fox protocol.
BACnet device communication
BACnet IP communication between the Cloud BMS N4 Supervisor and on-premises BACnet devices is supported, but you must disable auto-RepNet functionality for your Neeve network and enable BBMD on the N4 Supervisor. (Please contact your Technical Account Manager for guidance and limitations.)
Connect to the N4 Supervisor
Use the following steps to connect to the N4 Supervisor using Workbench, which should be installed on your local machine.
On the Remote Access Devices page, select the name of the Cloud BMS N4 Supervisor you added previously.
On the device profile page, under Access, click on the tile of the TCP connection.
This opens a dialog prompting you to download and install Remote Access Agent (if not already installed).
.png)
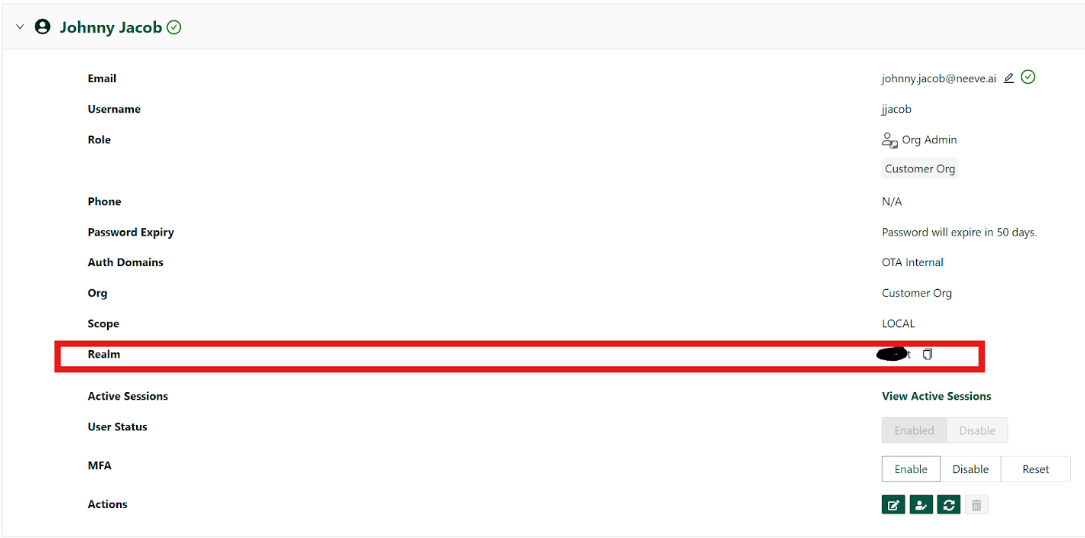
You will need your Realm to connect to the N4 Supervisor. To find your realm, go to your User Profile page, and expand the details under your user name.
Launch Remote Access Agen) and enter your user name (typically the email you use to log in to the Remote Access portal) and the realm that you noted in the previous step.
.png)
Select Login and then enter your Remote Access credentials.
Wait a few moments for the agent to establish the connection. The agent status should show as Running. If you encounter a timeout, you may need to reauthenticate..png)
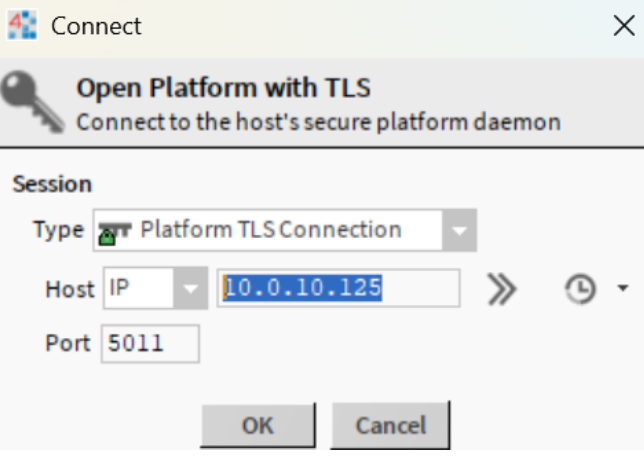
Launch Niagara Workbench and open the platform with the N4 Supervisor IP address.
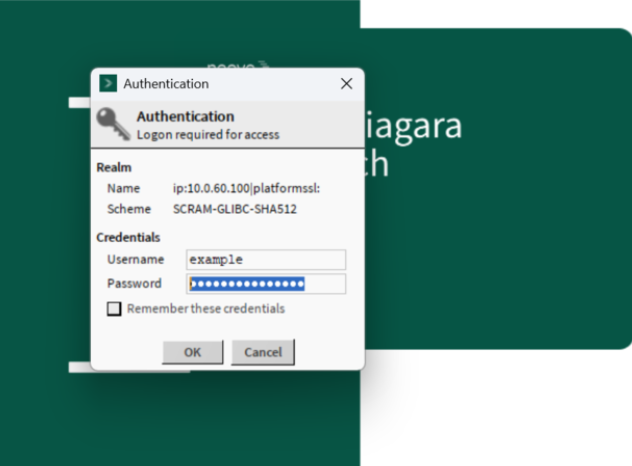
Enter the platform credentials (platform administrator username and password, as well as the system passphrase) for the Cloud BMS N4 Supervisor Platform. These will have been provided to you by Neeve.
Important
Make sure that you change the password for the administrator account and change the system passphrase after you log in. The instructions to do this are below. Save these credentials somewhere safe and secure.
If you have not yet updated your Workbench credentials or passphrase, complete the following steps. Otherwise, continue to the next procedure, Add the controller to the N4 Supervisor network.
From the Platform connection left menu, select Platform Administration, and then select Update Authentication.
In the Authentication dialogue, update the platform administrator user name and password. Save these credentials in a secure location.
.png)
Return to the Platform Administration menu, and then select System Passphrase.
In the Set System Passphrase dialogue, set the new system passphrase. Make sure to save the new passphrase in a secure location.
.png)
Add the controller to the N4 Supervisor network
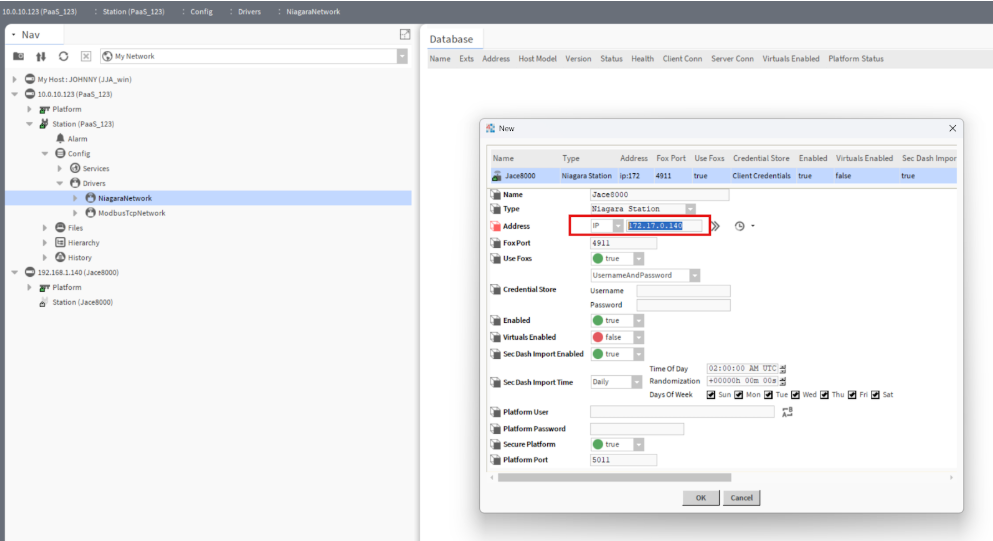
The following steps use a RepNet IP address to add the JACE or other controller to the Niagara N4 Supervisor network.
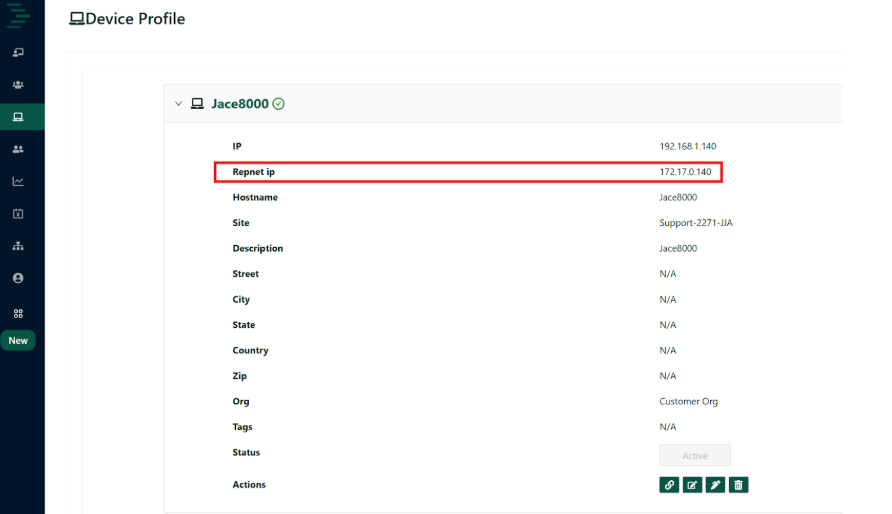
On the Remote Access Devices page, select the name of the controller to open the device profile page. Note the RepNet IP.
In Niagara Workbench, navigate to the Niagara network and then enter the controller RepNet IP address to add it to the database.
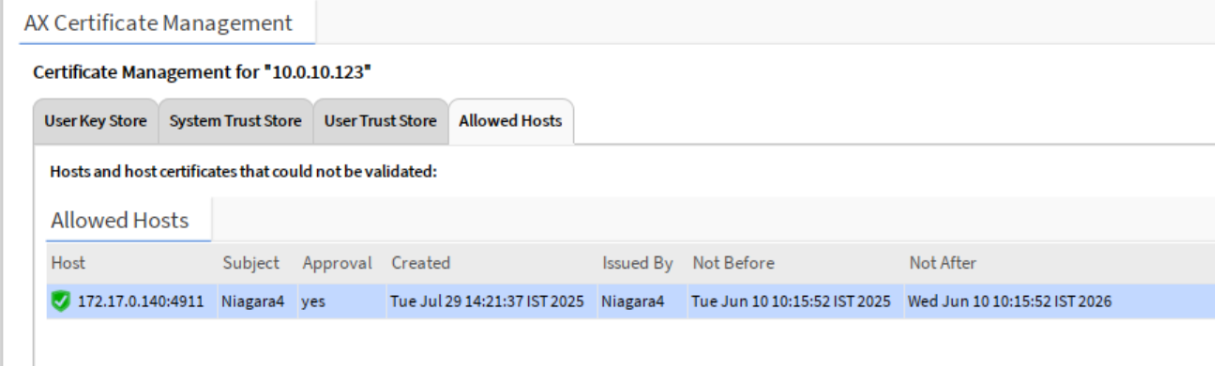
Under Services > Certificate Management, approve the device.
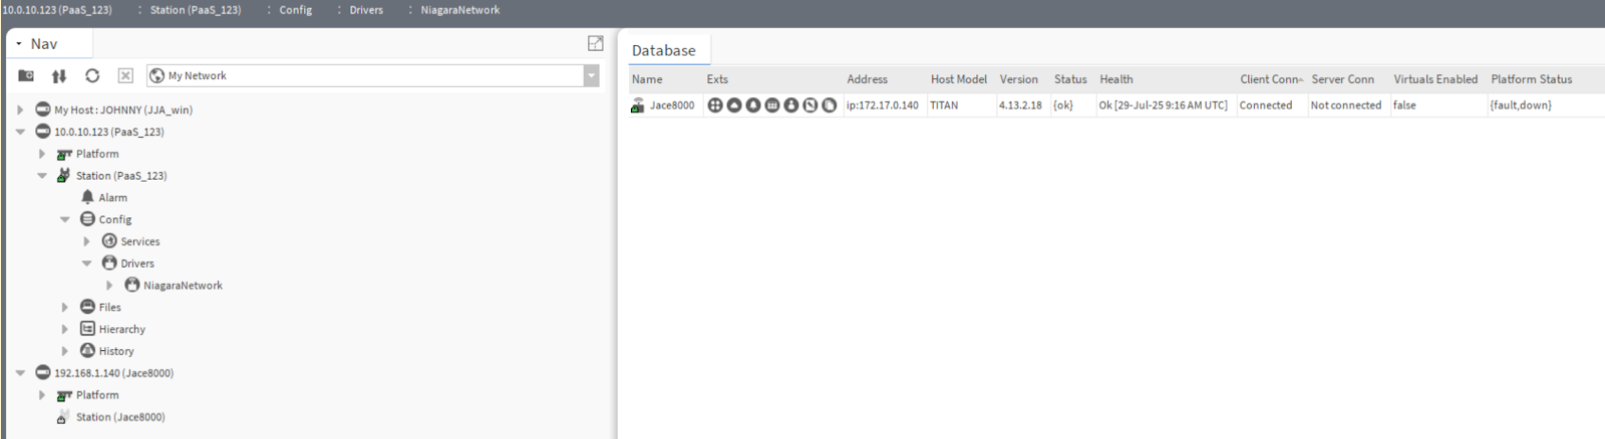
Confirm the controller is successfully added to the Niagara network.
You will see that the JACE controller is successfully connected to the Cloud BMS N4 Supervisor.
Add the controller and N4 Supervisor in Remote Access
Your Supervisor will automatically be added to the Remote Access portal as part of the set-up process. If you accidentally delete the remote access connnection use the following steps to re-add the JACE (or other) controller and Cloud BMS N4 Supervisor in Remote Access.
Log in to the Remote Access portal and select Devices.
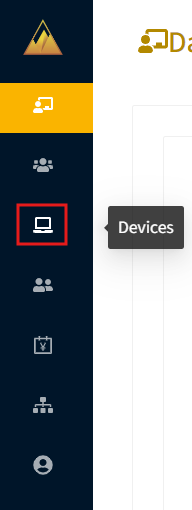
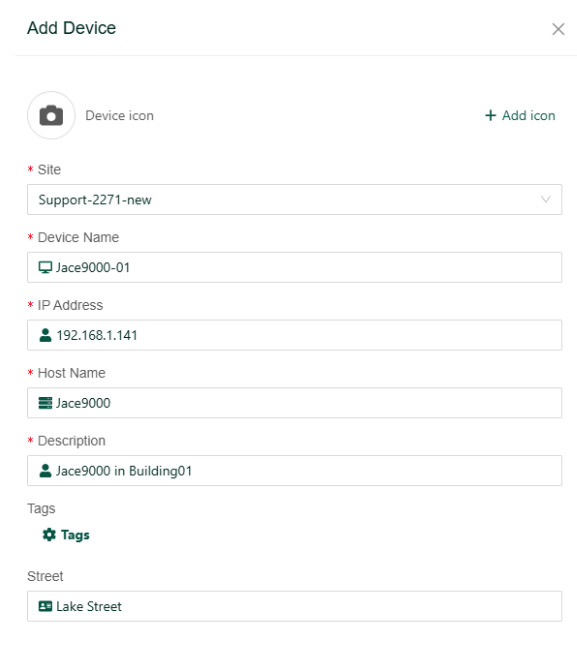
On the Device Endpoints page, select + Add Device.
In the Add Device dialog, enter the required identifying information for the device. For Site, select the on-premises node from the dropdown list, and then complete the other required fields, including device name, IP address, host name, and device description.
Select Submit & Add Connections.
In the Associate Connections dialog, add a new HTTPS connection, add the name, and specify port 8443. Make sure to use the same port number for the Niagara Station web services port.
Enable the Apply default rules option.
Select Review and then select Submit & Add to Group.
In the Associate groups to the connections dialog, assign one or more groups to the connection.
Once you return to the Device Endpoints page, select + Add Device again.
This time, enter the device details for the N4 Supervisor. For Site, select the cloud/VDI node from the dropdown list, and then complete the other required fields.
For IP address, enter the IP of the N4 Supervisor that the Neeve team provided you.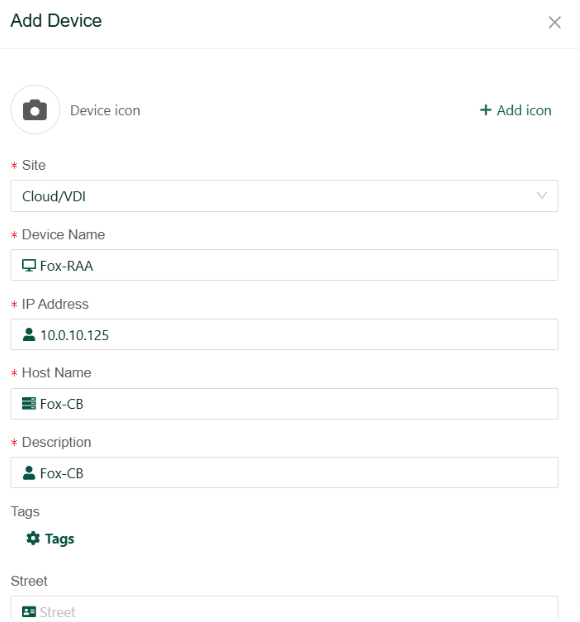
Select Submit & Add Connections.
In the Associate Connections dialog, add the following connections (use the plus tab + to add more than one connection):
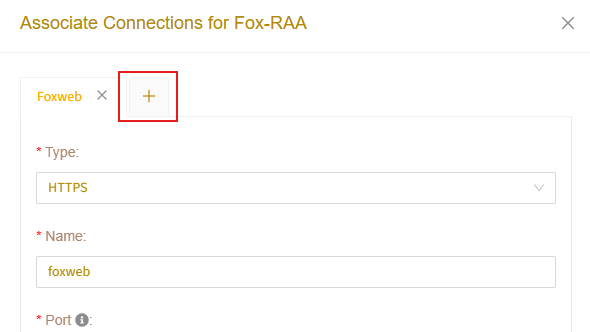
HTTPS connection using port 8443
TCP connection using ports 5011,4911
These are default ports for Niagara frameworks, but you can change these port numbers as needed.
Use the plus icon (+) tab to add another conEnable the Apply default rules option for these connections, then select Review and Submit & Add to Group.
In the Associate groups to the connections dialog, assign one or more groups to the connections.
Frequently asked questions
Q: Does Niagara network discovery scan all the JACE networks in the building through the secure edge tunnel from the Cloud BMS N4 Supervisor?
A: Niagara network uses FOX protocol for communication between stations, which uses TCP. So, you need to manually enter the JACE station IP address (Use RepNet IP) as TCP cannot cross subnets.
Q: How do I know the network tunnel between a JACE and Cloud BMS N4 Supervisor station is connected?
A: Log in to the Secure Edge Portal and under networks, and under Remote Networks check for a Connected status on the connection.
Q: Are there ways to perform a ping command from Cloud BMS N4 Supervisor?
A: Yes. Add a JACE station under the Niagara network in Supervisor, then right-click the station and under the Action menu, select the ping command.
Q: How can I verify that my Workbench and Cloud BMS N4 Supervisor is communicating?
A: Open Remote Access Agent on your PC/Laptop system tray, click on the apps, and then look for the connected Supervisor name IP address and port (5011 or 4911) sending and receiving packets.
Q: Does Cloud BMS N4 Supervisor communicate with Modbus IP devices?
A: Yes, you can add a Modbus device using its RepNet IP address.
Q: Does Cloud BMS N4 Supervisor perform a BACnet discovery of on-prem BACnet/IP devices?
A: Yes, but you need to disable the RepNet IP address and instead use the native IP address and configure the supervisor as BBMD or foreign device. Contact support@neeve.ai to enable additional configurations in the cloud.