This section describes how to manage webhooks, including setting up, editing, listing, testing deleting, and states.
Setting up webhooks
The steps to set up a webhook include adding the webhook, deploying its endpoint, and asking us to verify your webhook.
Add a webhook
To add a webhook, use the following POST request with the request body parameters:
| Name | Type | Required or Optional | Description |
|---|---|---|---|
name | string | Required | Name of your webhook. |
url | string | Required | Your webhook's HTTPS URL. |
metadata | object | Optional | Custom attributes to specify as Label. |
headers | object | Optional | Additional HTTP request headers you want to include when calling the webhook. You can specify up to three headers with total header length of up to 2048 characters. |
secret | string | Optional | Your webhook client secret. If you don't specify a secret, we’ll provide one for you.' |
curl -X POST \
  -H 'X-API-KEY:<your_api_key>' \
  -H "Content-type:application/json" \
  -d '{"name":"<your_webhook_name>", \
       "url":"<your_webhook_url>", \
'https://<your_company>.manage.iotium.io/api/v1/webhook'
The response includes the following information:
{
  "id":"<your_webhook_id>"
  "name":"<your_webhook_name>",
  "url":"<your_webhook_url>",
  "is_enabled":false,
  "secret":"<your_webhook_client_secret>"
}
Save the value of the secret field because it’s required to verify the webhook.
The is_enabled field is set to false, indicating that the webhook is in the disabled state. You need to verify the webhook successfully to enable it. To understand the webhook states, see Understanding webhook states.
You may add a maximum of three webhooks.
Deploy your webhook endpoint
Develop and deploy your application that will receive webhook notifications from ioTium. Deploy your application with a publicly available HTTPS endpoint for the webhook URL. HTTPS endpoint with a self-signed certificate isn’t supported, so use a valid SSL/TLS certificate from a globally trusted Certificate Authority.
Handle requests to verify your webhook endpoint
Before enabling the webhook, ioTium verifies that your application intends to receive notifications at that URL. When you ask us to verify your webhook endpoint, we'll generate a challenge code and then make an HTTP GET request to your webhook endpoint with the challenge code as a query parameter. The GET request request has the following ioTium-specific headers:
| Header | Description |
|---|---|
Your additional headers | Additional HTTP request headers you wanted to include in the notification request. When adding the webhook, you specified up to three headers with total header length of up to 2048 characters. |
X-Iotium-Timestamp | POSIX timestamp in milliseconds, specifying when we sent this notification request. |
Your webhook endpoint should do the following in response to the GET request:
- Extract the timestamp from the X-Iotium-Timestamp header field and the challenge code from the query parameter.
- Compute the challenge response this way:
The secret is the value of the secret field you saved above from the response to the POST request to add webhook.challenge_response = Hex-encoded(HMACSHA256(<>,>,>
Following is a sample code snippet in Python (Version 3.8.2) to compute the challenge response:Java
This is a sample code snippet in Java (Version 1.8.0_191) to compute the challenge response:def genChallengeResponse(secret:str, timestamp:str, challenge:str) -> str: import hmac import hashlib message:str = "%s.%s" % (timestamp, challenge) return hmac.new(secret.encode(), message.encode(), hashlib.sha256).hexdigest()
3. Respond within three seconds with a 200 OK status with the message body containing both the challenge code and the challenge response:import java.nio.charset.Charset; import java.security.GeneralSecurityException; import javax.crypto.Mac; import javax.crypto.spec.SecretKeySpec; public String getChallengeResponse(String secret, String timestamp, String challenge) { String HMAC_SHA256_ALGORITHM = "HmacSHA256"; String hmac_hex = null; try { SecretKeySpec signingKey = new SecretKeySpec(secret.getBytes(Charset.defaultCharset()), HMAC_SHA256_ALGORITHM); Mac mac = Mac.getInstance(HMAC_SHA256_ALGORITHM); mac.init(signingKey); String message = timestamp.concat(".").concat(challenge); byte[] rawHmac = mac.doFinal(message.getBytes(Charset.defaultCharset())); hmac_hex = bytesToHex(rawHmac); } catch (GeneralSecurityException e) { throw new IllegalArgumentException(); } return hmac_hex; } public String bytesToHex(byte[] bytes) { char[] hexArray = "0123456789abcdef".toCharArray(); char[] hexChars = new char[bytes.length * 2]; for (int j = 0; j < bytes.length; j++) { int v = bytes[j] & 0xFF; hexChars[j * 2] = hexArray[v >>> 4]; hexChars[j * 2 + 1] = hexArray[v & 0x0F]; } return new String(hexChars); }Shell{ "challenge":"",>",>">">
Ask secure edge to verify your webhook endpoint
When your webhook endpoint is ready for verification, use a POST request to ask us to verify it. We verify your webhook by sending a GET request to the webhook URL. If we're able to verify the challenge response, the webhook setup is complete.
Use the following POST request to ask Secure Edge to verify the webhook:
curl -X POST \
  -H 'X-API-KEY:<your_api_key>' \
  -H "Content-type:application/json" \
'https://<your_company>.manage.iotium.io/api/v1/webhook/<your_webhook_id>/verify
We’ll then make a GET request to your webhook endpoint with a challenge code as a query parameter. The request looks like this:
curl -X GET \
  -H '<your_additional_headers>' \
  -H "Content-type:application/json" \
  -H "X-Iotium-Timestamp:<TIMESTAMP>" \
'<your_webhook_url>?challenge=<your_webhook_challenge>'
For the verification to succeed, the response to the above GET request must meet the following requirements:
- The response is received within three seconds with a 200 OK status.
- The response body contains both the challenge code and challenge response.
- The challenge response is valid.
If the verification is successful, the response to your POST request contains the following information:
{
  "id":"<your_webhook_id>",
  "message":"Webhook verification successful",
  "status":"SUCCESS"
}
If the verification fails, the response to your POST request contains the following information:
{
  "id":"<your_webhook_id>",
  "message":"Webhook verification failed",
  "status":"FAILED"
}
If you try to verify a webhook that has already been verified, you’ll get an error.
If the webhook verification is successful, its state changes to enabled and it is ready for use for alert notification. If the verification fails, the webhook remains disabled and therefore unusable.
Edit webhooks
To edit your webhook, make a PUT request with one or more of the following parameters.
| Name | Type | Required or Optional | Description |
|---|---|---|---|
name | string | Optional | Name of your webhook. |
url | string | Optional | Your webhook's HTTPS URL. |
metadata | object | Optional | Custom attributes to specify as Label. |
headers | object | Optional | Additional HTTP request headers you want to include when calling the webhook. You can specify up to three headers with total header length of up to 2048 characters. |
secret | string | Optional | You webhook client secret. If you don't specify a secret, we’ll provide one for you. |
For example, to change your webhook’s URL make the following PUT request:
curl -X PUT \
  -H 'X-API-KEY:<your_api_key>' \
  -H "Content-type:application/json" \
  -d '{"url":"<your_new_webhook_url>"}' \
'https://<your_company>.manage.iotium.io/api/v1/webhook/<your_webhook-id>
The response includes the following information:
{
  "id":"<your_webhook_id>"
  "name":"<your_webhook_name>",
  "url":"<your_new_webhook_url>",
  "is_enabled":false,
  "secret":"<your_webhook_secret>"
}
If a webhook is in an enabled state, the webhook edit action disables the webhook. You need to verify the webhook successfully to enable it.
Get a list of webhooks
To get the list of all your webhooks, make the following GET request:
curl -X GET \
  -H 'X-API-KEY:<your_api_key>' \
  -H "Content-type:application/json" \
'https://<your_company>.manage.iotium.io/api/v2/webhook/'
The response includes details of all your webhooks, including name, ID, URL, is it enabled, and number of alerts using it for notification:
[
  {
  "id":"<your_webhook_1_id>",
  "name":<your_webhook_1_name>",
  "url":"<your_webhook_1_url>",
  "metadata":{"labels":{"key":"value"}},
  "headers":{"key", "value"},
  "is_enabled":true,
  "created_at":"2020-02-26T08:18:58.022Z",
  "created_by":{"id":"<your_user_id>", "name":"<your_user_name>"},
  "subscription_count":2
  }
  {
  "id":"<your_webhook_2_id>",
  "name":<your_webhook_2_name>",
  "url":"<your_webhook_2_url>",
  "metadata":{"labels":{"key":"value"}},
  "headers":{"key", "value"},
  "is_enabled":true,
  "created_at":"2020-02-27T09:28:59.022Z",
  "created_by":{"id":"<your_user_id>", "name":"<your_user_name>"},
  "subscription_count":1
  }
]
To get the details of a specific webhook, make the following GET request:
curl -X GET \
  -H 'X-API-KEY:<your_api_key>' \
  -H "Content-type:application/json" \
'https://<your_company>.manage.iotium.io/api/v1/webhook/<your_webhook_id>'
The response includes details of the specified webhook, including name, ID, URL, is it enabled, and number of alerts using it for notification:
{
  "id":"<your_webhook_id>",
  "name":"<your_webhook_name>",
  "url":"<your_webhook_url>",
  "metadata":{"labels":{"key":"value"}},
  "headers":{"key", "value"},
  "is_enabled":true,
  "created_at":"2020-02-26T08:18:58.022Z",
  "created_by":{"id":"<your_user_id>", "name":"<your_user_name>"},
  "subscription_count":2
}
Test webhooks
You can generate a sample notification to test your webhook. Make the following POST request with the request parameters:
| Name | Type | Required or Optional | Description |
|---|---|---|---|
alert_type | string | Required | Specify the alert metric type: NODE_STATE_CHANGE, TUNNEL_STATE_CHANGE, SERVICE_STATE_CHANGE, CERT_EXPIRY, HEADLESS_EXPIRY, NODE_IP_CHANGE, or NODE_UPGRADE. |
curl -X POST \
  -H 'X-API-KEY:<your_api_key>' \
  -H "Content-type:application/json" \
  -d '{"alert_type":"<your_alert_notification_type>"}' \
'https://<your_company>.manage.iotium.io/api/v1/webhook/<your_webhook_id>/test'
If your webhook is disabled, we will respond with 422 (Unprocessable Entity) status code. Otherwise, we will make a POST request to your webhook endpoint with a sample notification JSON body based on the specified alert notification type.
We wait for five seconds for a response from your webhook endpoint. If the request times out or fails, we don’t retry. On success, we return the response from your webhook endpoint:
{
  "status":<your_webhook_response_status>,
  "response":"<your_webhook_response_body>"
 }
Deleting webhooks
By default, you can’t delete a webhook if it is currently in use to send alert notification. If you want to delete the webhook anyway, you have to use the force option.
To delete a webhook that is not used for alert notification, make the following DELETE request:
curl -X DELETE \
  -H 'X-API-KEY:<your_api_key>' \
  -H "Content-type:application/json" \
'https://<your_company>.manage.iotium.io/api/v1/user/webhook/<your_webhook_id>'
To delete force-delete a webhook that is used for alert notification, make the following DELETE request:
curl -X DELETE \
  -H 'X-API-KEY:<your_api_key>' \
  -H "Content-type:application/json" \
'https://<your_company>.manage.iotium.io/api/v1/user/webhook/<your_webhook_id>?force=true'
Understanding webhook states
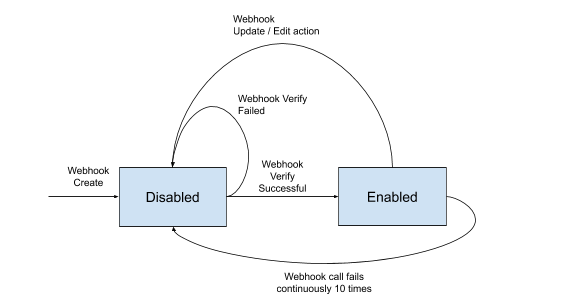
To understand webhook states, keep in mind that:
- When you add a new webhook, its state is disabled.
- When you verify a webhook successfully, its state changes to enabled and it is ready for use.
- When you update or edit a webhook, its state changes to disabled.
- If a webhook notification request fails continuously 10 times, its state changes to disabled. You'll have to verify the webhook again to enable it.
The diagram below illustrates these states: