This article describes how to provision and launch Cloud Connectors (formerly Virtual iNodes) and Virtual Edge Nodes (formerly Virtual Edge iNodes) on Microsoft Azure.
Provisioning and launching Cloud Connectors in Azure
In this section, learn how to provision and launch a Cloud Connector in Azure.
Provision a Cloud Connector in Azure
To provision a Cloud Connector in Azure:
- In the Secure Edge Portal, select the plus icon (+) from the left menu to open the Add Node page.
- Enter a unique name for the Cloud Connector.
- Optionally, you can also specify custom attributes as labels. (For more on labels, see Using labels.)
- Select the Cloud Connector profile.
- Download the security credentials required for launching the Cloud Connector by selecting the Microsoft Azure logo. You will only be able to download this file once. These credentials are crucial for secure deployment, so save the downloaded file in a secure location and don't share it.ImportantThe security credentials file is only available for download once. It contains critical security information needed for the Cloud Connector. Ensure this file is stored securely and deleted after the Cloud Connector is successfully created.
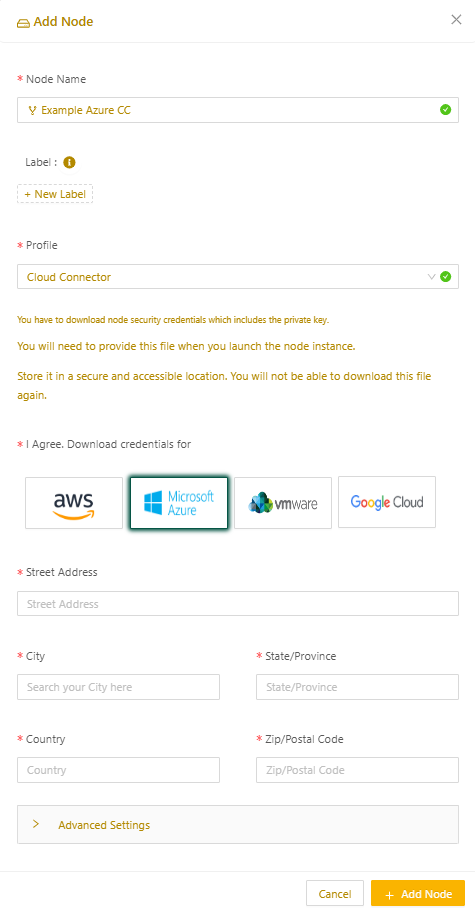
- Select Add Node to complete the provisioning.
Launch a Cloud Connector
To launch a Cloud Connector in Azure, use the Secure Edge Azure Node Launcher, a tool that deploys Secure Edge instances automatically in your Azure subscriptions. It uses your Azure login credentials and associated Azure privileges to copy, build, and deploy node VHD files from Secure Edge upstream servers. Before you download and run the launcher, review the prerequisites in the next section.
Review launcher prerequisites
The Secure Edge Azure Node Launcher uses Windows built-in components to avoid use of any third-party tools or applications from sources other than Microsoft. You’ll need the following built-in or add-on tools from Microsoft to run the launcher successfully:
- Administrator access to the computer
- Windows PowerShell 5
- Azure PowerShell 5.1
- Windows 10 Pro or Windows Server 2016
- Connectivity to your Azure subscription from the computer
- Azure privileges and sufficient CPU resources to create and modify Azure:
- Create, copy, modify Azure blob storage account
- Access existing Azure resources and create new resources
- Create VM images
- Create virtual machines
- Create and modify networking components such as network security groups (NSG), IP address, network cards, subnets, etc.
If you’re unsure about CPU resources or permissions, please consult with your administrator or Azure support.
You can find the version of Windows PowerShell installed on your computer by running the following cmdlet in the Windows PowerShell window:
$PSVersionTableThe output should be similar to the following:
Name                           Value ----                           ----- PSVersion                      5.1.18362.145 PSEdition                      Desktop PSCompatibleVersions           {1.0, 2.0, 3.0, 4.0...}
BuildVersion                   10.0.18362.145 CLRVersion                     4.0.30319.42000 WSManStackVersion              3.0
PSRemotingProtocolVersion      2.3
SerializationVersion           1.1.0.1
You can find out whether Azure PowerShell is installed on your computer by running following cmdlet in the Windows PowerShell window:
Get-Module -ListAvailable | ?{$_.Name -like "Azure*"}The output of the cmdlet should appear as follows:
ModuleType Version    Name                                ExportedCommands ---------- -------    ----                                ---------------- Script     0.5.4      Azure.AnalysisServices              {Add-AzureAnalysisServicesAccount, Restart-AzureAnalysisSe... Script     4.6.1      Azure.Storage                       {Get-AzureStorageTable, New-AzureStorageTableSASToken, New... Script     6.13.1     AzureRM Script     0.6.14     AzureRM.AnalysisServices            {Resume-AzureRmAnalysisServicesServer, Suspend-AzureRmAnal...
.
.
.
If your computer doesn’t have the necessary Azure PowerShell modules installed, run the following commands within the PowerShell window. You must have Administrator permission to run these commands.
Install-Module AzureRm Set-ExecutionPolicy UnRestrictedDepending upon your computer security configuration settings, you may be asked additional questions during the installation process. In most cases, you must allow the settings change to proceed.
Before you start the launcher, you need to rename the security credentials file you downloaded in when you provisioned the Cloud Connector. Your downloaded security credentials file has the name of your Cloud Connector, without any file extension. However, the launcher requires the file extension to be .yaml. Use the Windows Command shell command rename to add the .yaml file extension to your security credentials file. For example:
rename MyVirtualiNode MyVirtualiNode.yamlDownload the Secure Edge Azure Node Launcher
Follow these steps to download the Secure Edge Azure Node Launcher:
- Log in to the Secure Edge Portal.
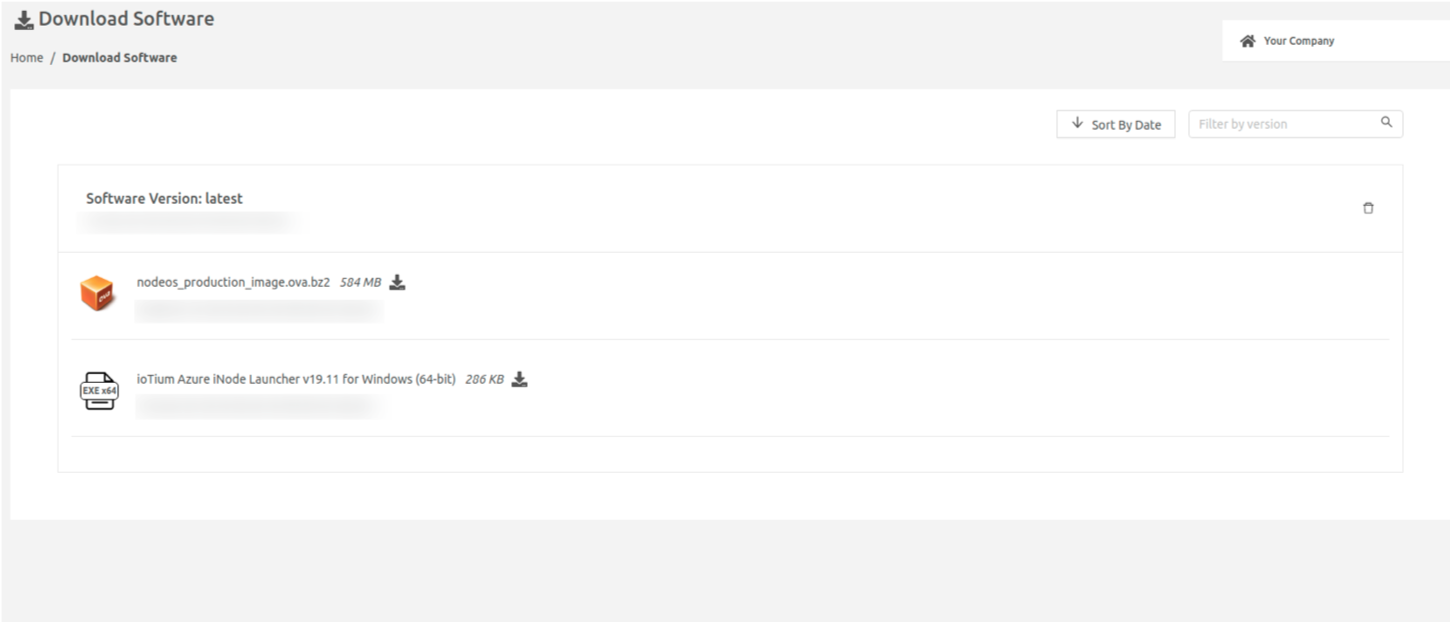
- From the bottom of the left navigation menu, select the Download Software icon.
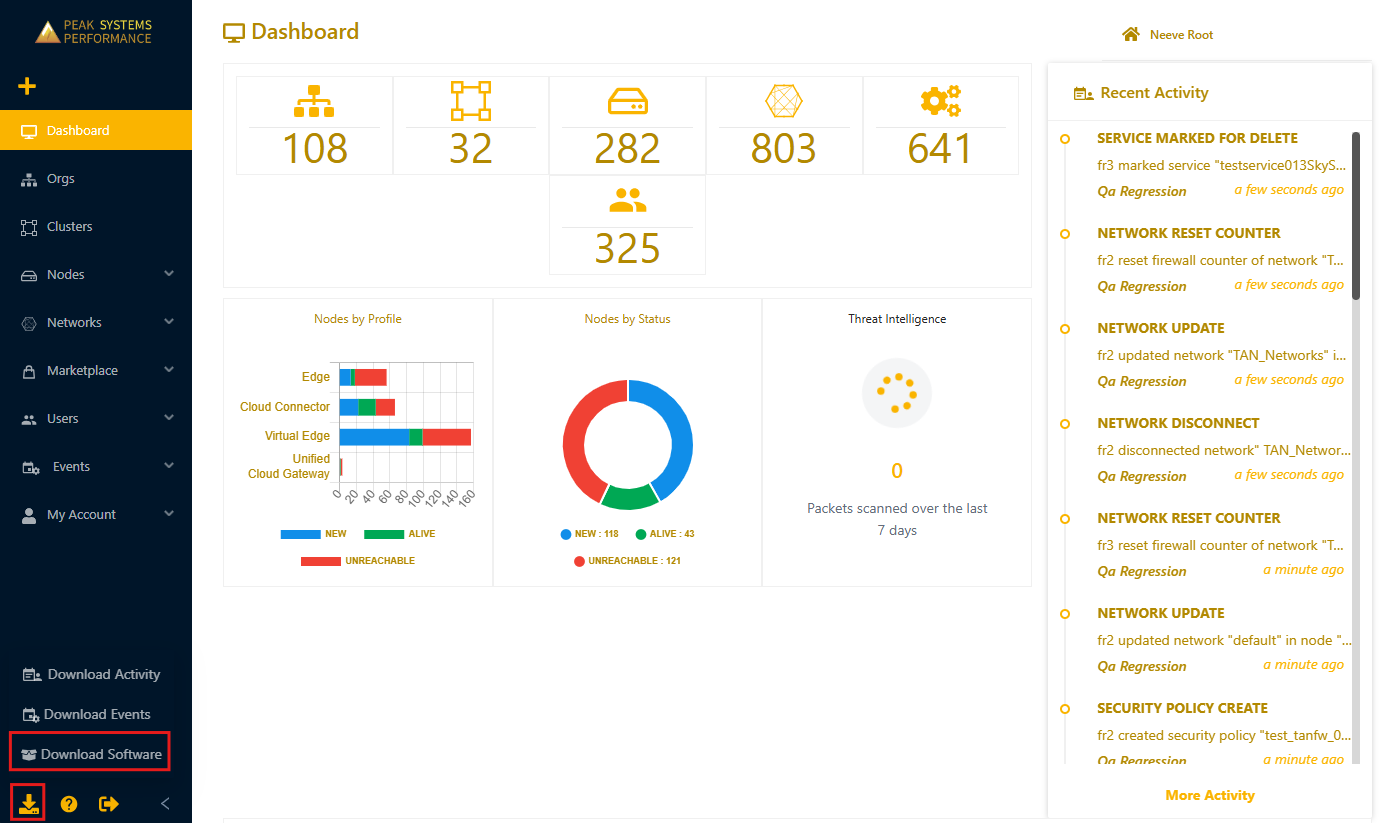
- On the Download Software page, select the launcher executable.
Before you continue to run the launcher, make sure you’ve confirmed your Windows environment as described in the prerequisites section above.
Run the launcher
Follow these steps to start the launcher:
- Double-click on the launcher executable file.
- When the launcher interface displays, select the Login button to display a window requesting login to your Azure subscription.
- Log in to your Azure subscription.
- Continue to the applicable subsection below:
- Launch a fresh deployment: Used for deploying a new node in a new Azure resource group
- Launch an existing deployment: Used for deploying a new node in an existing Azure resource group
Launch a fresh deployment
The Fresh Deployment process automates the creation of the following Azure resources:
- Azure storage account
- Virtual machine image
- Virtual machine
- Subnet
- Network security group (NSG)
- Network interface
- Public IP address
- Port 22 Inbound, 443 Inbound and Outbound NSG rules
To launch a fresh deployment:
- In the launcher, specify the following required fields:
- Azure Subscription: Select your Azure subscription ID from the dropdown. You see only subscriptions that have privileges assigned to your user account.
- Node VHD - The latest released version of the node is automatically selected.
- Node Security Credentials - Select the security credentials file that you renamed to add the .yaml file extension.
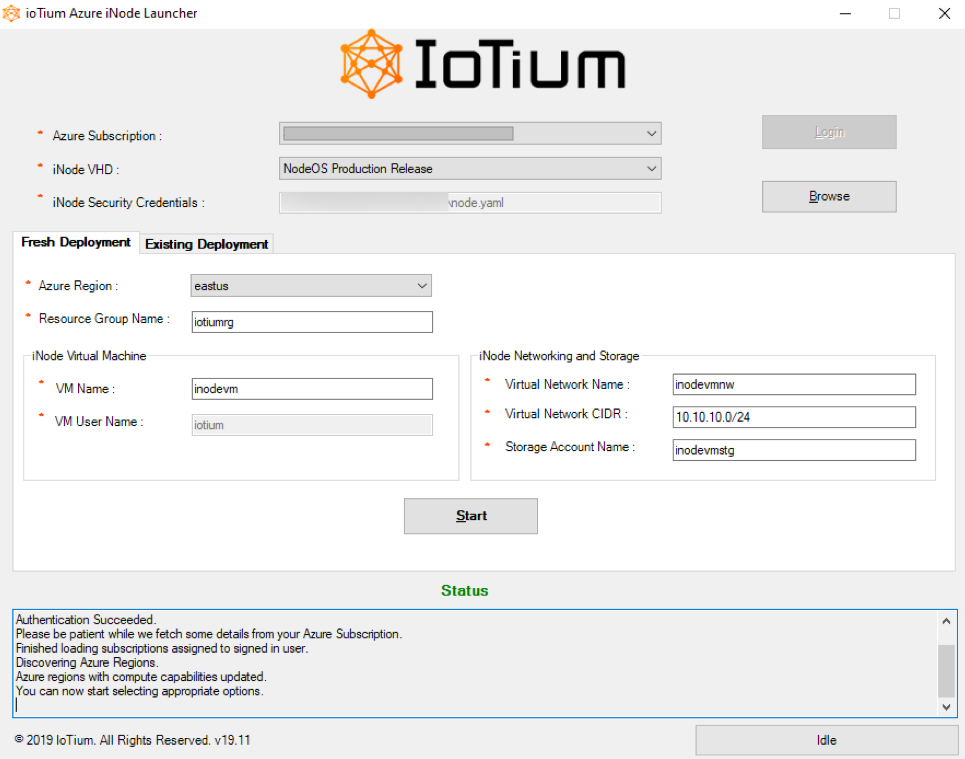
- Select the Fresh Deployment tab and complete the required fields. Note that the Azure Region field only displays Azure regions with compute capabilities. For VM Name, make sure to follow Azure naming conventions.
- Select Start. The deployment process takes approximately 10 minutes to complete.
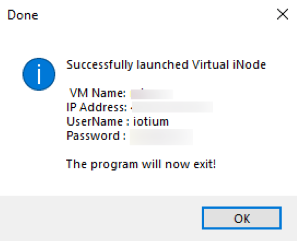
- If successful, a confirmation dialog will appear. Select OK to exit the launcher.
If the deployment fails, a failure dialog will appear. Select OK to exit the launcher, and refer to the log files to help troubleshoot the issue.
Launch an existing deployment
To launch a new Cloud Connector in an existing deployment:
- In the launcher, specify the following required fields:
- Azure Subscription: Select your Azure subscription ID from the dropdown. You see only subscriptions that have privileges assigned to your user account.
- Node VHD - The latest released version of the node is automatically selected.
- Node Security Credentials - Select the security credentials file that you renamed to add the .yaml file extension.
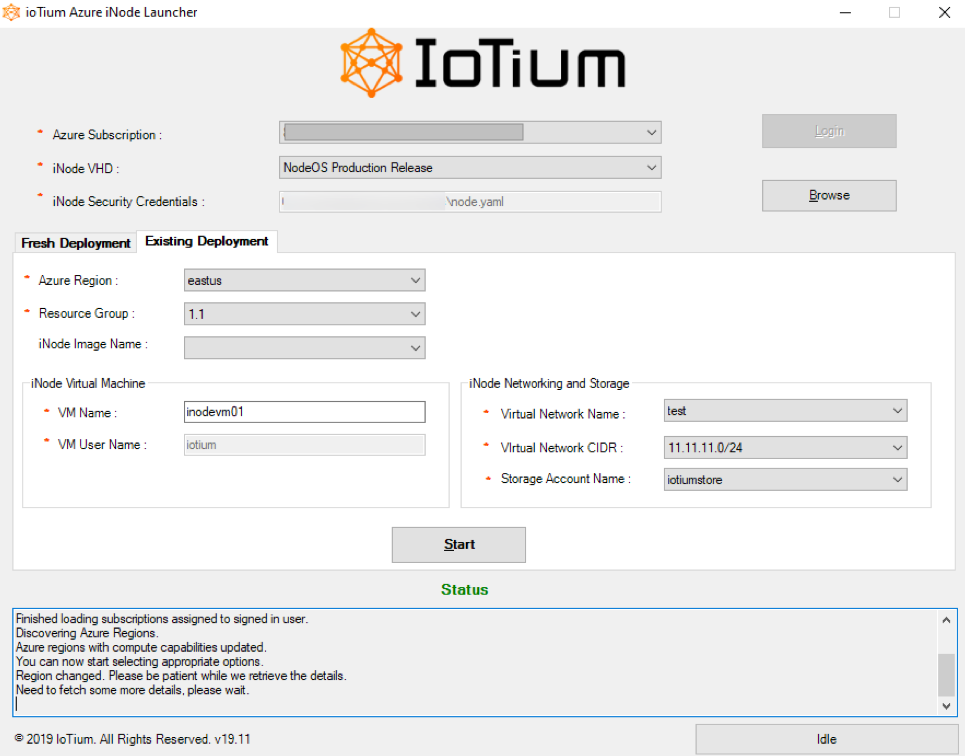
- Select the Existing Deployment tab to deploy the new node in an existing Azure resource group.
- Select your Azure region (only the Azure regions that have compute capabilities are displayed) and resource group. All fields under the Existing Deployment tab (except VM Name) are retrieved from the selected region and resource group.
- Add the new VM Name. Make sure to follow Azure naming conventions.
- For the Cloud Connector image, choose one of the following:
- Download the latest image from Secure Edge. In this case, leave the field Node Image Name deselected.
- Use an existing image in the resource group. In this case, select the image in the Node Image Name field (you must have deployed at least one image previously using the Launcher).
- If you left the Node Image Name field deselected, when you select Start, you’ll be prompted with the following dialog:
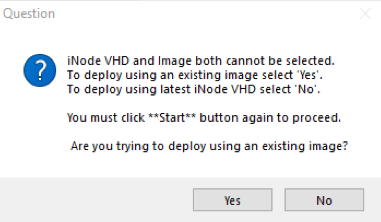
Select Yes or No:
Yes - Download the latest VHD from Secure Edge upstream servers.
No - Go back and select an existing image in your resource group. - Select Start. The deployment will take approximately 10 minutes.
- If successful, a confirmation dialog will appear. Select OK to exit the launcher.
If the deployment fails, a failure dialog will appear. Select OK to exit the launcher, and refer to the log files to help troubleshoot the issue.
Log files for troubleshooting
The launcher generates two log files on the user’s desktop or the user profile that is used to run the launcher:
- Secure Edge.Az.csv - Contains the logs from the Azure subscription. In environments with strict access control, this file may not be visible.
- Secure Edge.UI.log - Contains the PowerShell transcript, which can help identify the cause of deployment failure.
Provisioning and launching Virtual Edge Nodes in Azure
This section describes how to provision and launch Virtual Edge Nodes in Azure.
Provision a Virtual Edge Node in Azure
To provision a Virtual Edge Node in Azure:
- In the Secure Edge Portal left menu, select the plus icon (+) to display Add Node.
- Enter the name for the Virtual Edge Node.
- Optionally, specify custom attributes as labels. (For more on labels, see Using labels.)
- Select the Virtual Edge profile.
- Download the security credentials required for launching the Virtual Edge Node by selecting the Microsoft Azure logo. You will only be able to download this file once. These credentials are crucial for secure deployment, so save the downloaded file in a secure location and don't share it.ImportantThe security credentials file is only available for download once. It contains critical security information needed for the Cloud Connector. Ensure this file is stored securely and deleted after the Cloud Connector is successfully created
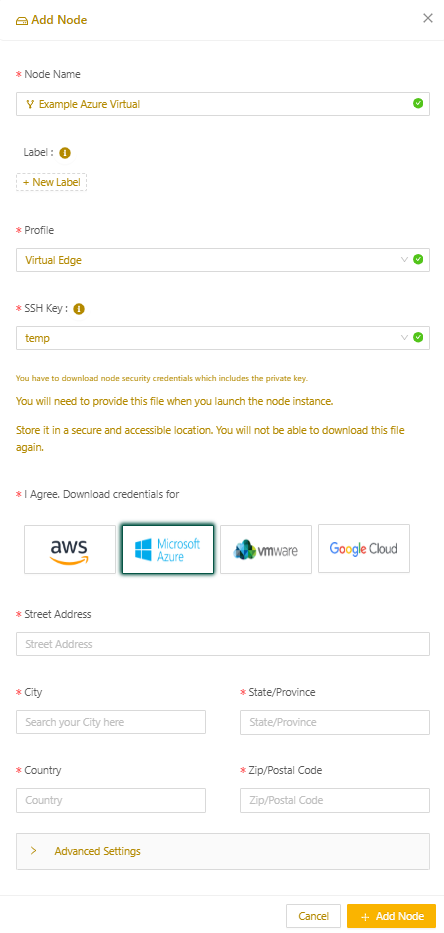
- Select Add Node to complete the provisioning.
Launch a Virtual Edge Node in Azure
To launch a Virtual Edge Node in Azure, log in to your Azure account. The launch process includes the following tasks:
- Create the Azure resource group, storage account, and container blob
- Copy an Azure-ready Virtual Hard Disk (VHD) from Secure Edge
- Create an image from the VHD file
- Create a virtual network, network interface, and public IP address
- Launch the Virtual Edge Node virtual machine (VM)
- Add a route to the route table and associate it with the virtual network
The following sections describe these steps primarily using the Azure Portal, but you can also use the Azure CLI or any other Azure-capable application programming interface (API). Refer to naming rules and restrictions for Azure resources. In particular, avoid using special characters in the container name.
Create an Azure resource group
If you don't plan to use an existing resource group, create one.
- In the Azure portal, select Resource groups.
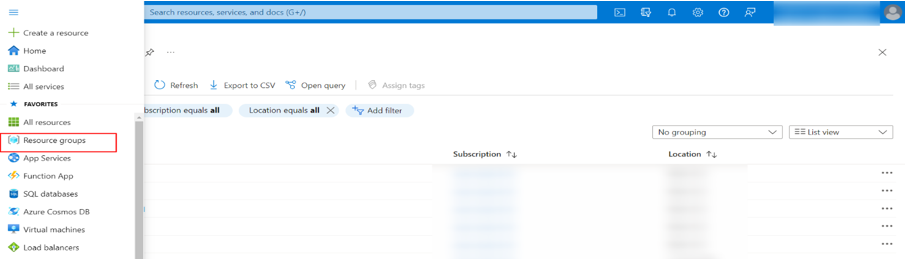
- Select Create to create a new group.
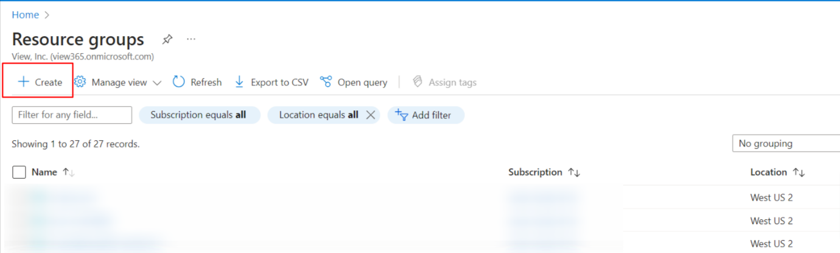
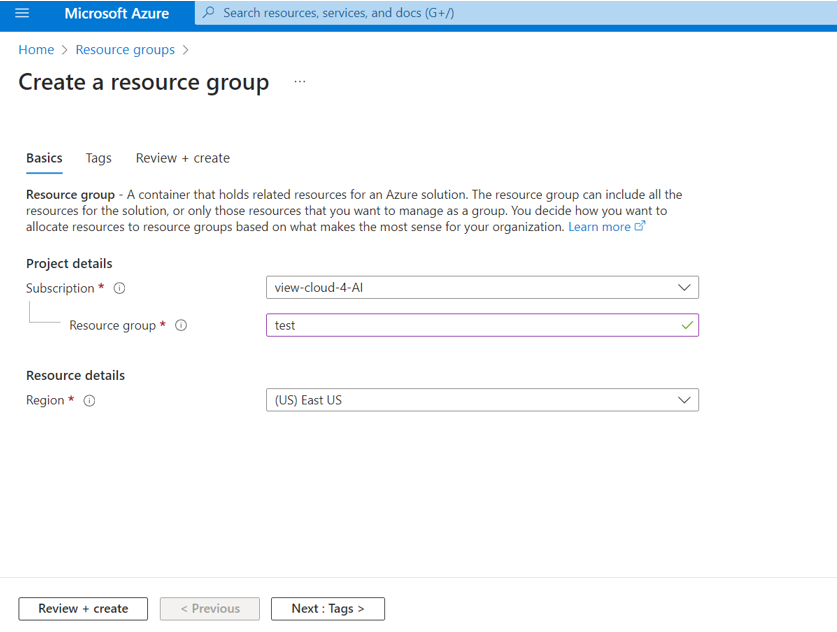
- Name the resource group, select the region for the Virtual Edge Node, and then select Review + create.
- Refresh the page and verify that the resource group has been created.
Create the storage account and container
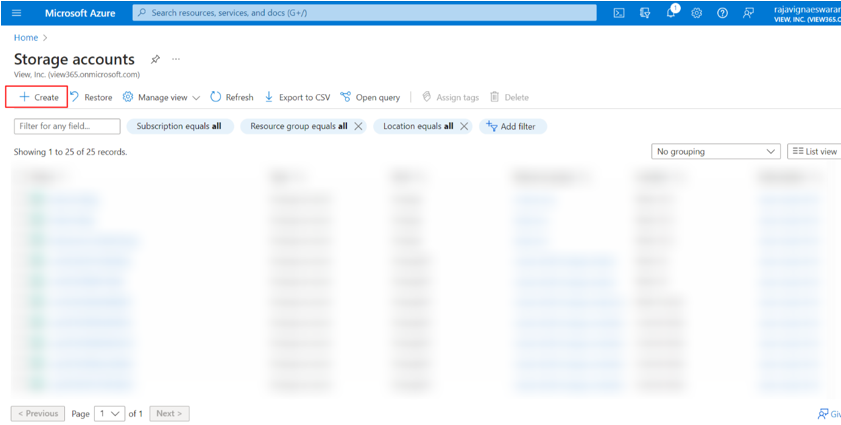
- In the Azure Portal, select Storage accounts.
- Select the storage account where the VHD file will be uploaded. If you don’t have a storage account, select + Create to create one.
- Give the storage account a name, and select the same Resource group that you selected or created in Create the resource group. Select the same region that you chose for the resource group. For Performance, select Premium.
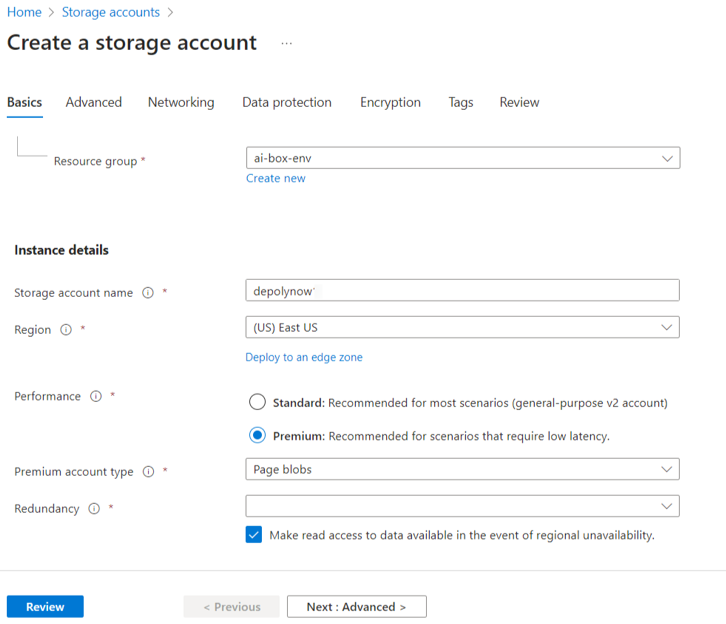
- Refresh the page and verify that the storage account was created.
- In the storage account under Blob service, select Containers.

- Select a container to use to upload the Azure-ready VHD file, or select + Container to create one.
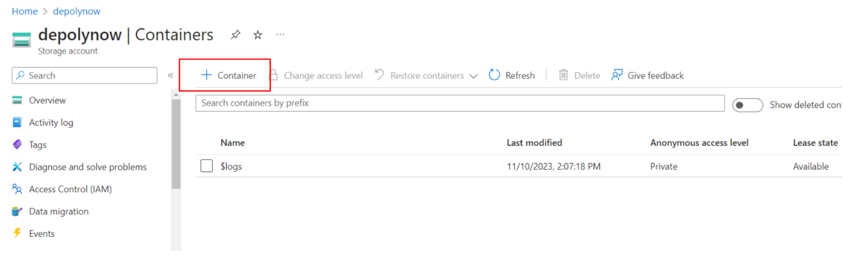
- Enter a name for the new storage container and select Create.
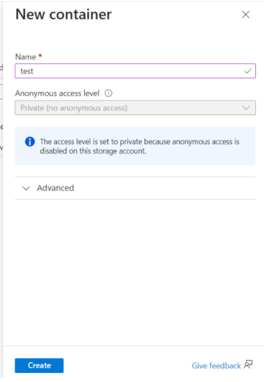
- Refresh the page and verify that the container was created.
Copy the Azure-ready VHD file from Secure Edge
You need to copy the Azure-ready VHD file to launch the Virtual Edge Node in Azure. We recommend using the Azure CLI for efficiency, but you can also use the Azure portal or any other Azure-capable API.
- From the top menu bar of the Azure portal, select the Cloud Shell icon to open a Bash shell.
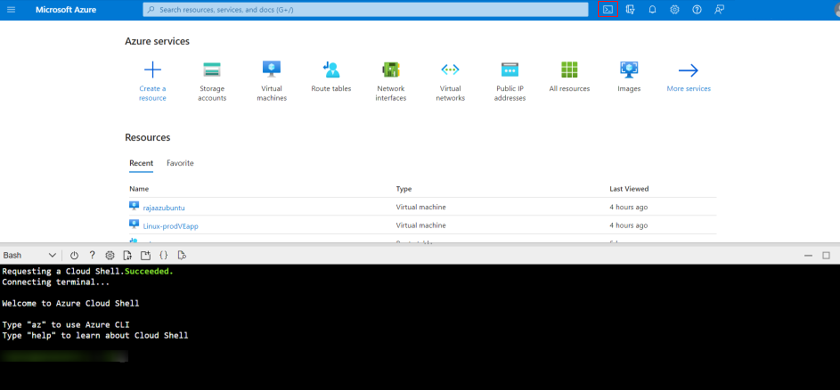 The first time you open a Bash shell, Azure creates a storage name that it associates with the storage account you created previously. This is used to save the configuration files (custom-data.txt) used for deploying a Virtual Edge Node. After you open the Bash shell the first time, any subsequent times that you select the Azure CLI, the Bash shell will open automatically.NoteWe don’t use the storage name created by Azure during the configuration. Nonetheless, don’t remove it. Azure associates the storage name with the console; if it’s removed, the configuration files will not be available.
 - Use the following CLI command to copy the VHD file (replace the variables with the correct names for your account, container, destination, and VHD file):Shell
az storage blob copy start --account-name <MyStorageAccName> --destination-container <MyContainerName> --destination-blob <IoTiumVHDFileName> --source-uri
In the following example, the command copies the VHD file named nodeos-production.vhd from the link https://iotiumstore.blob.core.windows.net/release/latest/nodeos-production.vhd to a local container test in a storage account depolynow.
az storage blob copy start --account-name depolynow --destination-container test --destination-blob nodeos-production.vhd --source-uri
https://iotiumstore.blob.core.windows.net/release/latest/nodeos-production.vhd
The above command creates the blob for the VHD file in the container, allocating 11.2 GB immediately. Then it starts copying the VHD file, which might take a long time, depending on network connection and the location of the Azure storage account.
The copied VHD file is available in the container as blob.
Create an image using the Secure Edge VHD
- In the Azure portal, select Images and then select + Create.
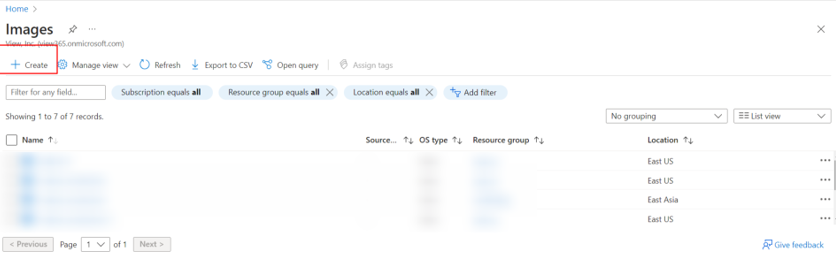
- Complete the fields as follows:
- Give the image a name. (Remember that this image is a template that will later be deployed to a Virtual Edge Node with a different name.)
- Ensure that the region is the same as the region of your storage account
- Set OS type to Linux.
- In the Storage blob field, select Browse to open a panel that lists your storage accounts. Navigate through the storage accounts and containers to locate the VHD that you copied.
- Set Account Type to Standard SSD.
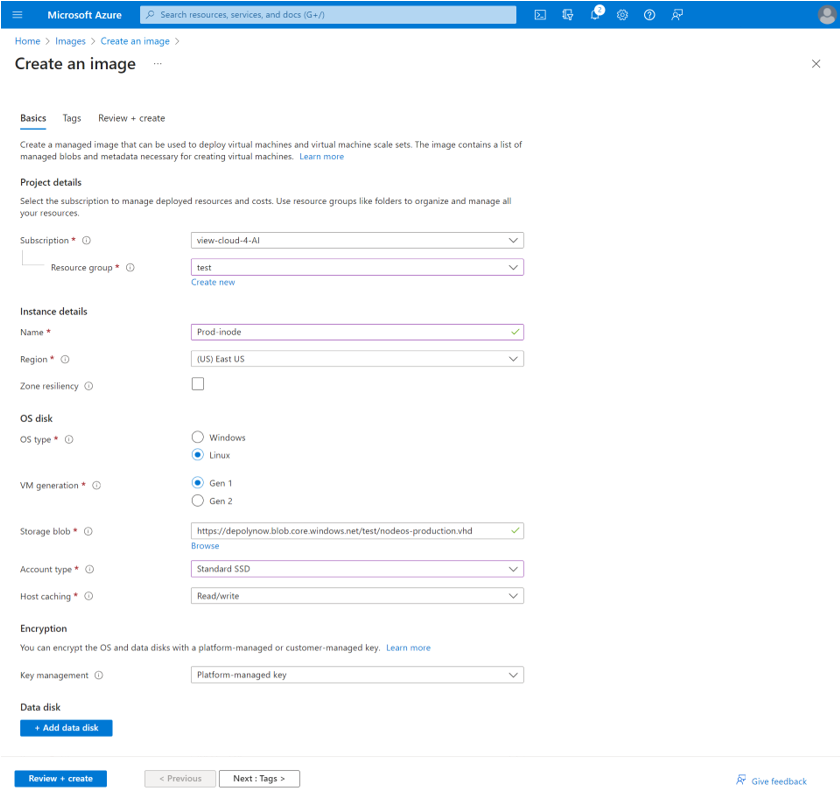
- Select Review + create and review the image creation details.
- Select Create to complete the image creation.
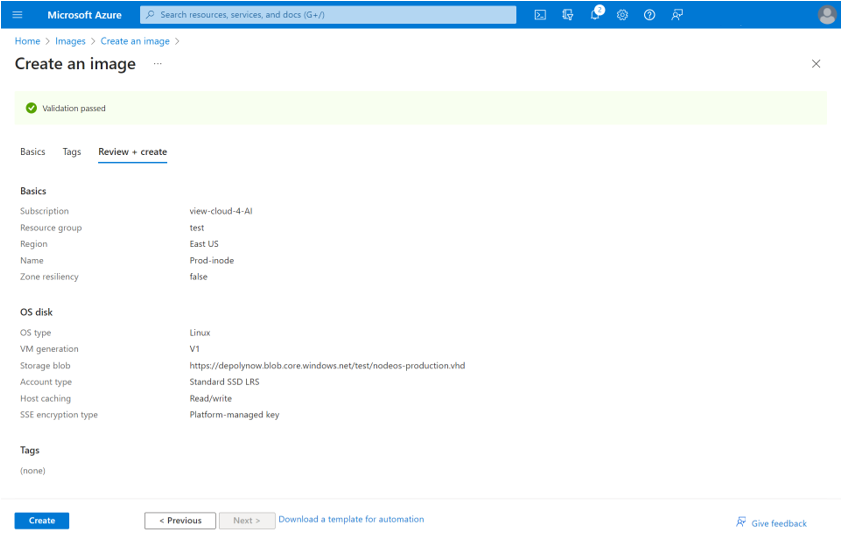
- Return to the Images panel and verify the new image was created. You can now use this new image to deploy the Virtual Edge Node in Azure.
Create the virtual network and network interface
The virtual network is a cloud subnet for your application instance and Virtual Edge Node instance.
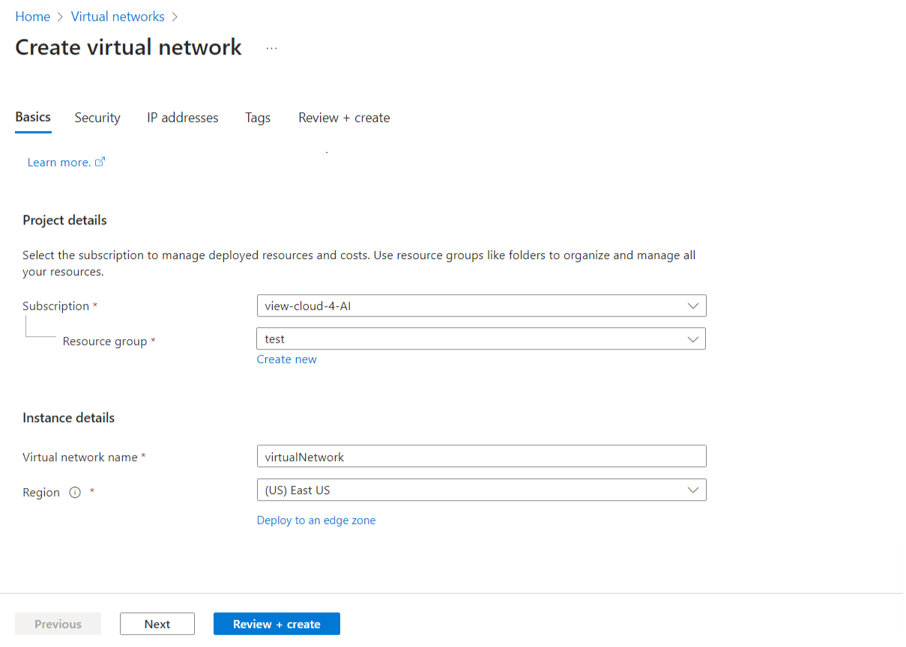
- In the Azure portal, select Virtual Network. If you don’t have a virtual network, select + Create to create one.
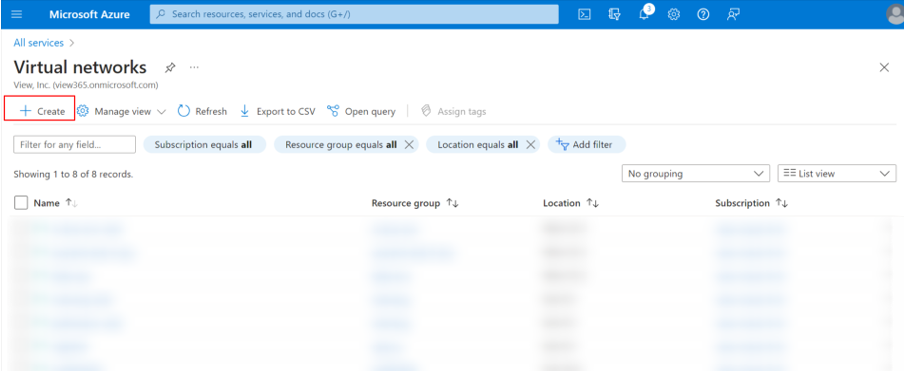
- Give the virtual network a name and choose the region that is the same as the storage account and resource group.
- In the IP Addresses tab, create two subnets. First, add a subnet with a name and address range in the virtual network. This typically takes a few minutes to complete.
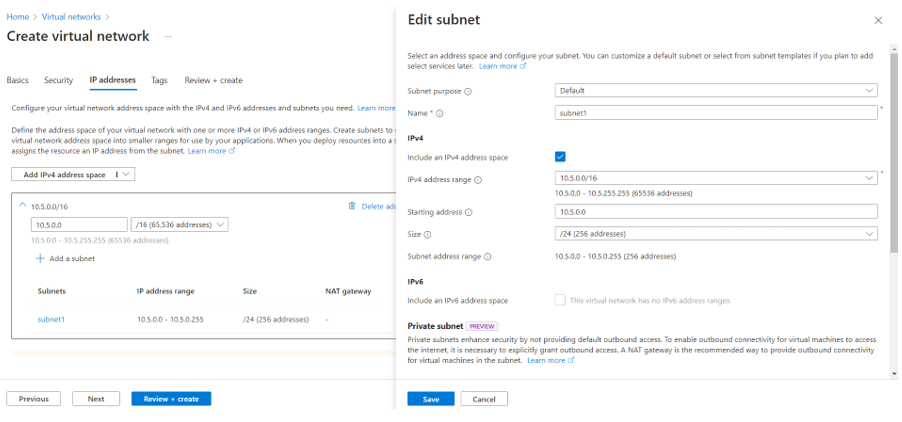
- Then, add one more subnet in the same virtual network.
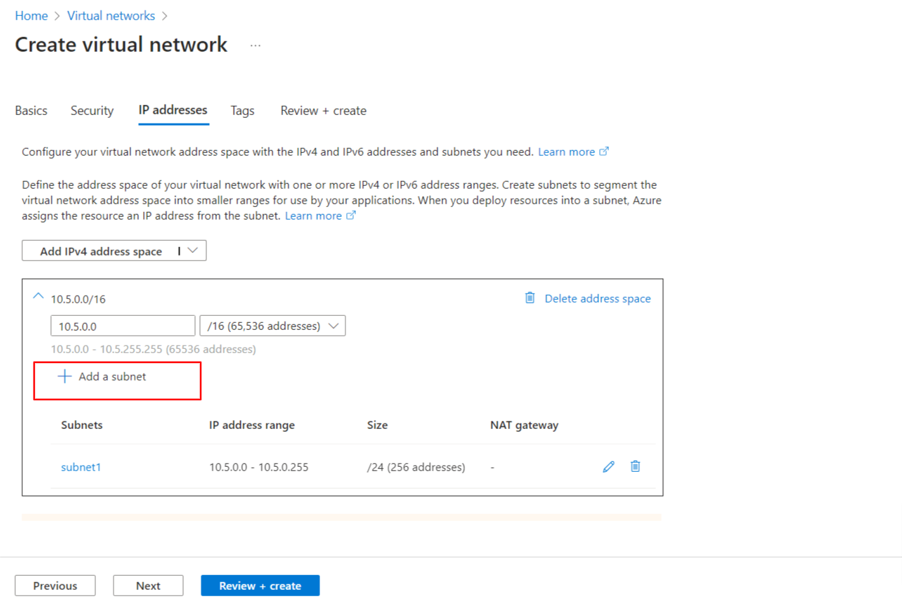
- The Virtual Edge Node needs two network interfaces to communicate with other devices in the virtual network. Select Network Interface > Create.
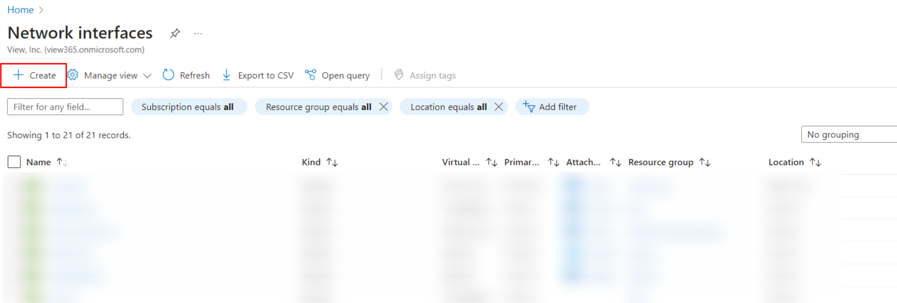
- Under Subnet, select the subnet created in Step 3, the same region as the resource group and storage account, and then select Create. This interface will be internet facing and will take a few minutes to create.
- Repeat Steps 5 and 6 to create one more network interface to map to the TAN network.
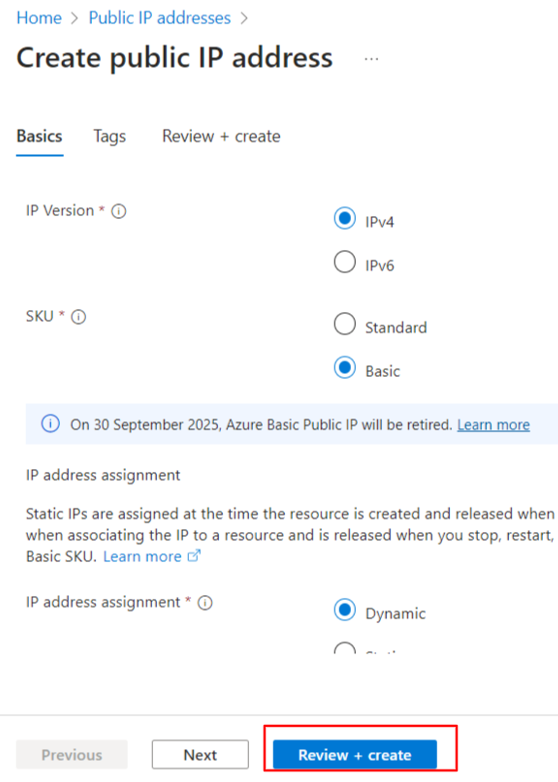
Create a public IP address
The Virtual Edge Node needs a public IP address to communicate with the Edge Node and the Secure Edge portal.
- In the Azure portal, select Public IP address > Create.
.png)
- Select IPv4 for IP version, Dynamic for IP address assignment, and select the resource group and region.
- Now, you'll need to apply the public IP address to the network interface created in the previous section. On the public IP address, select Associate and in the Associate pubic IP address window, select resource type Network Interface and select the interface from the drop-down list.
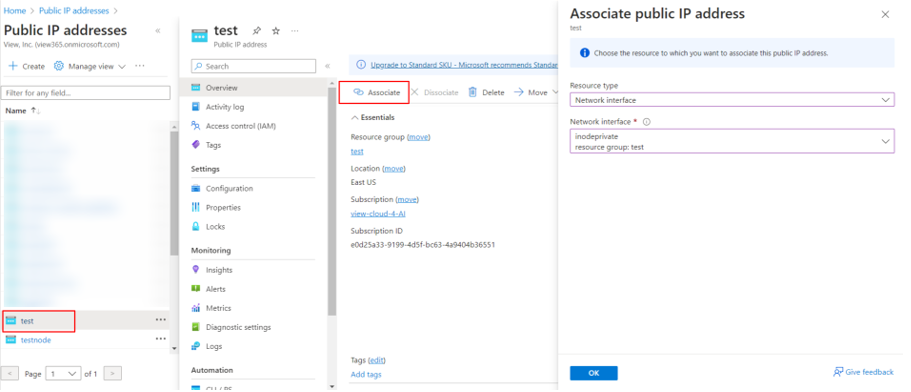
- Select OK to apply the configuration.
Launch the Virtual Edge Node VM
Launch the Virtual Edge Node VM in the same resource group and region where you created the image and network interface. The following steps use the Azure CLI for simplicity, however you can also use the Azure Portal or any other Azure-capable API.
- Open the file containing the security credentials that you downloaded and copy its contents.
- Open the Bash (Linux) Azure Cloud Shell.
- In the Azure Bash shell, type the following command to open a new file custom-data.txt:Shell
vi custom-data.txt - Paste the contents of the security credentials file you copied in Step 1 into this file and save your changes.
- Finally, launch the Virtual Edge Node instance with the following command:
Below is an example.az vm create -g test --image <image-name> --name <VM name> --custom-data <custom-data name> --nics <network interface 1 name> <network interface 2 name> --size Standard_B2s --admin-username iotium --admin-password "yourpasswordhere"
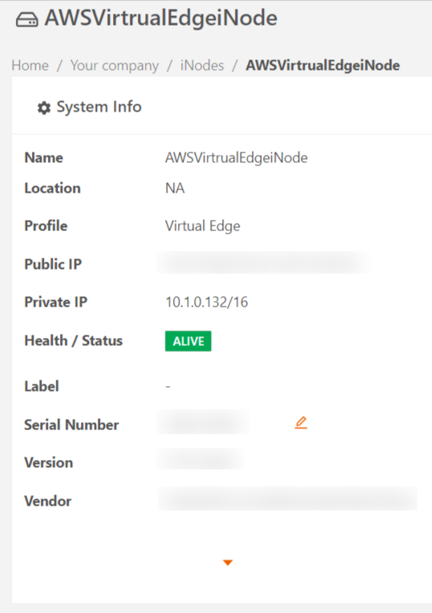
az vm create -g test --image Prod-inode --name Prod-inodeVE --custom-data custom-data.txt --nics inodeprivate TAN --size Standard_B2s --admin-username iotium --admin-password "examplepassword!"This action typically takes a few minutes to complete. To check whether the Virtual Edge Node launched successfully, log in to the Secure Edge Portal and confirm that the Node status shows as ALIVE.
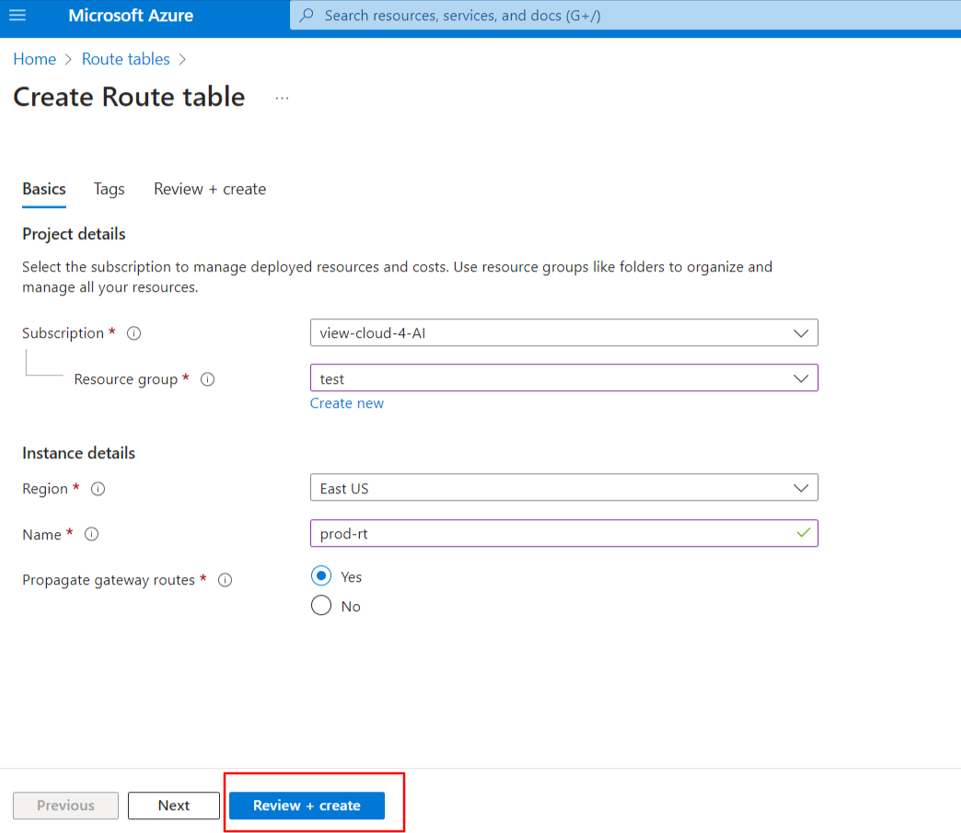
Add a route and associate it with the virtual network
- In the Azure portal, select Route tables and then select Create.
- Assign a name and select the resource group and region you used for the Virtual Edge Node.
- In the route table, select Select routes and then select Add.
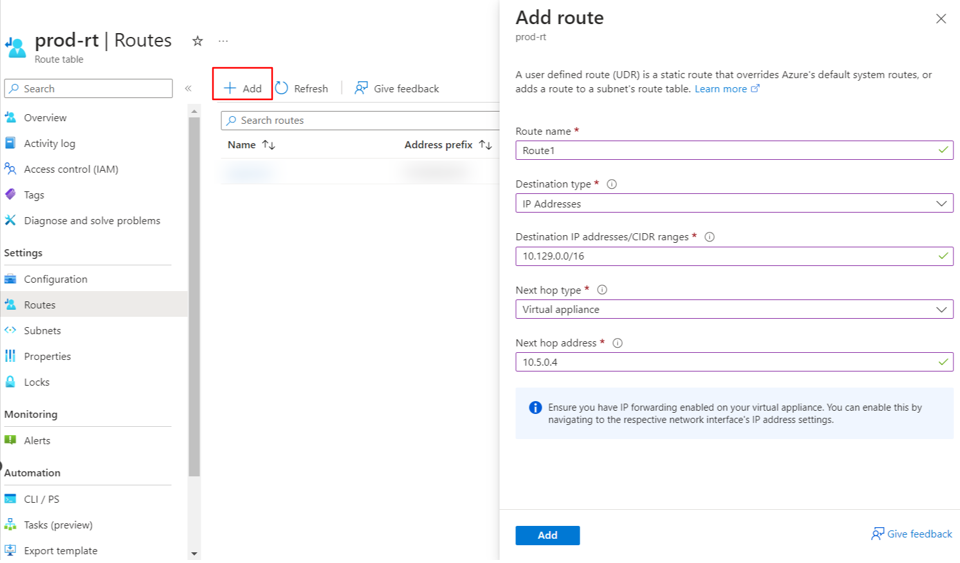
- Name the route and enter the TAN subnet for Address Prefix.
- Set Next hop type as Virtual appliance. Set Next hop address to the private IP address of the Virtual Edge Node.
- To associate the route to the virtual network, select Route table > Subnets.
- Select Associate and Virtual Network to associate the route to the virtual network.