This article explains how to provision and launch Edge Nodes (formerly Edge iNodes), which are the physical hardware that connects directly to your IIoT devices. Complete the following procedures to install the hardware device you received from Neeve and connect it to the network.
If you’re planning to use Virtual LANs (VLANs), see also Enabling VLANs for an organization.
Setting up physical network connections
As a prerequisite for operation, the Edge Node needs to be connected to the network. One Ethernet port is reserved for WAN connectivity, which must be linked to a network with internet access. For detailed requirements, see Prerequisites for Edge Node connectivity.
The remaining port(s) are available for connecting to LAN networks to support the following activities:
- Protection using the Edge Nodes firewall functionality
- Remotely accessing devices via the Remote Access Portal
- Running services and applications
- Facilitating cloud connectivity through secure tunnels
Depending on your Edge Node model, you'll have between two and four Ethernet ports available. You can see the available ports in the device's port diagram in the Secure Edge Portal. Sign in to the portal, navigate to the Edge Node’s Details page, and then select the Edge Node name next to Vendor.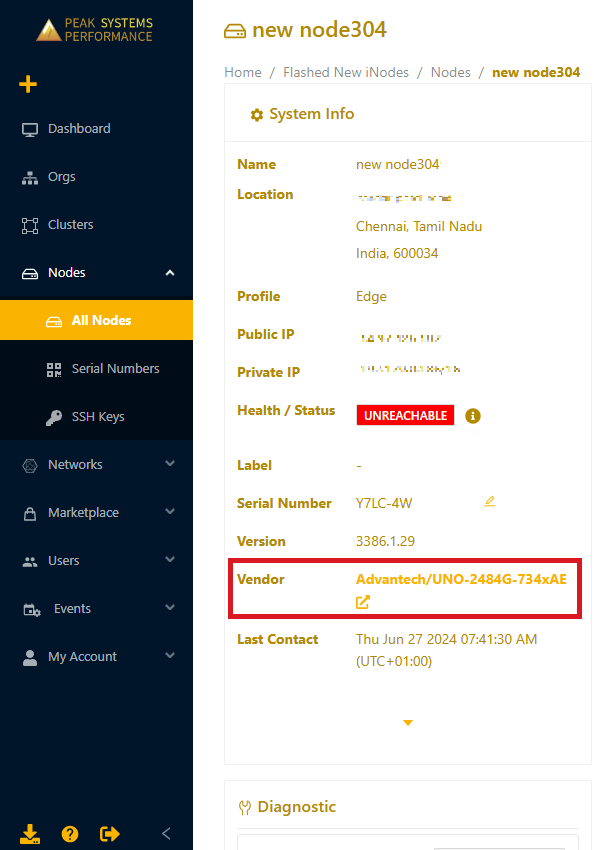
The hardware diagram will appear.
.png)
By default, on Model 2484 Edge Nodes, LAN A and LAN B are the only active ports. The labels shown in the diagram match the labels printed on the physical device. These labels are used throughout the portal to maintain consistency. To enable the other ports, refer to Advanced network interface configuration on Edge Nodes.
Connect the WAN-designated port to a network with internet access. Connect other ports as needed to the appropriate LANs. For converged networks, LAN ports on the Edge Node support VLAN segmentation. For details on VLAN configuration, refer to Using VLANs on Edge Nodes.
Provisioning Edge Nodes
Use the Secure Edge Portal to add Edge Nodes as network elements, assign them to local networks, and configure their attributes.
Add an Edge Node
- From the Secure Edge Portal left menu, select the plus icon (+) > Add Node.
- Enter the Edge Node name.
- Optionally, specify custom attributes as labels. (See Using labels for details.)
- Select the Edge profile.
- From the prepopulated list of hardware serial numbers, select the serial number that matches the label on your device.
- Select the SSH public key for console access. (If you don’t have an SSH public key to use, see Managing SSH key authentication for an Edge Node.)
- Next, add location details (street address, city, state/province, zip/postal code) to map your Edge Node on the Dashboard landing page.
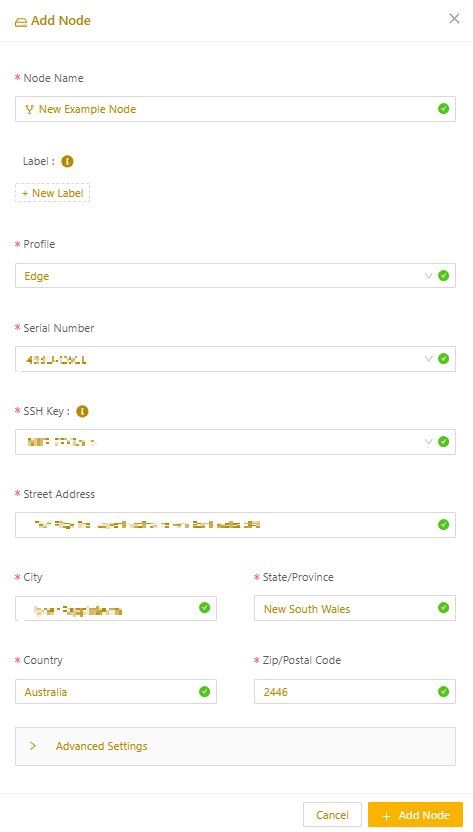
- Adjust the Data Saving Mode in Advanced Settings, if necessary. (For more on data saving mode, see Using data saving mode.)
- Select Add Node to complete the setup. Once added, the node will appear on the All Nodes page.
Add local networks for Edge Nodes
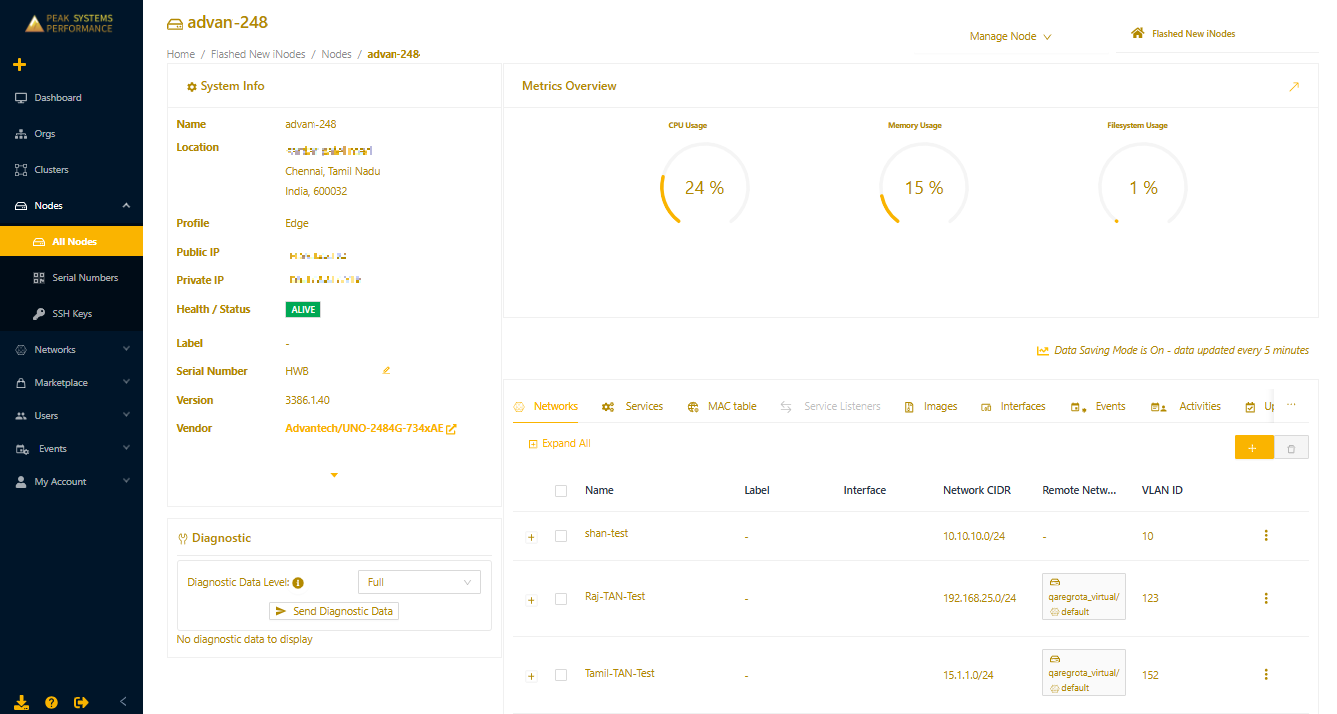
- Select the name of the newly added Edge Node to open its details page.
.png)
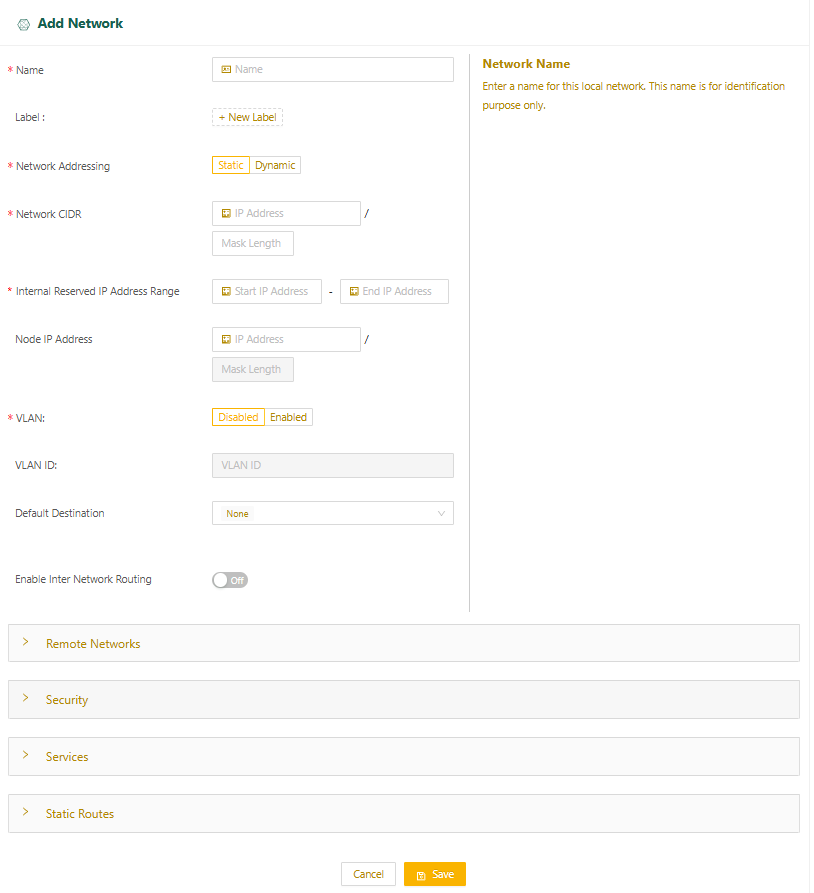
- Under the Networks tab, select the plus icon (+) to display the Add Network page. Enter the network name in the Name field, and specify any custom labels as needed. (For more on labels, see Using labels.)
Set up static or dynamic network addressing
You can set up either static or dynamic network addressing for the Edge Node. To set up static network addressing, the hosts in the network must be manually configured with static IP addresses. To create a dynamic local network for the Edge Node, a Dynamic Host Configuration Protocol (DHCP) server provides and manages IP addresses. Complete the steps in the applicable subsection below.
Create a static local network
- Select Static for Network Addressing.
- Specify the network's CIDR in the Network CIDR field.
- Specify a range of IP addresses (at least one) that will be reserved for Edge Node internal use. These IP addresses must be part of the same IP subnet as the local network's CIDR.
- For Node IP Address, you can set the IP address of the Edge Node interface. This is an optional field. If you don’t set it, the start IP address configured in the previous step will be the IP address for the Edge Node and the default gateway for devices on this network. If you set the Node IP Address, it will be the default gateway.
- If you plan to use services on this Edge Node, you need to set up IP addressing for those services. By default, the Edge Node assigns IP addresses for services dynamically from the Internal Reserved IP Address Range you specified. If you’re using the default, make sure you’ve reserved enough IP addresses. You need at least one more than the number of services you plan to run.
- If you plan to configure the services manually with static IP addresses, select the Services expansion panel and set Service Addressing to Static.
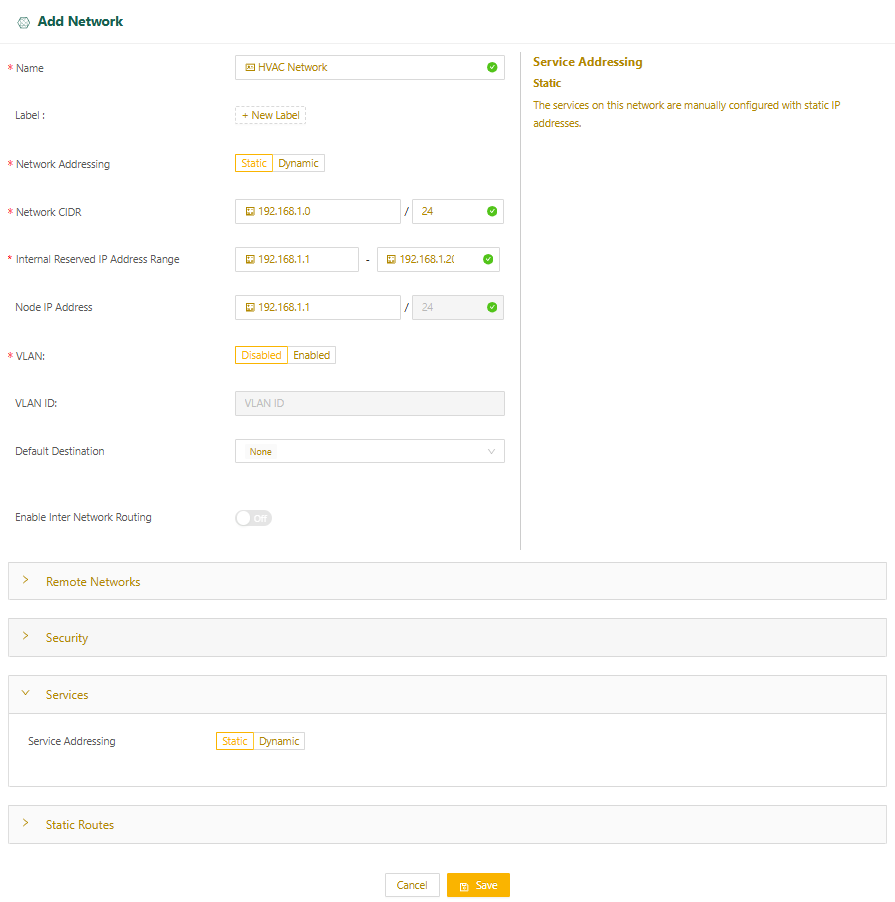
- Select Save and skip to the below section Complete network setup.
Create a dynamic local network
- Select Dynamic for Network Addressing.
- For Node IP Address, specify the IP address of the Edge Node interface on this network. This will be the default gateway for devices on this network.
- If you plan to run services on the Edge Node, when you select dynamic network addressing, by default, a DHCP server assigns IP addresses to services on the network and the Services panel is disabled. You may, however, configure static IP addresses for the the core services, Kea DHCP, PowerDNS, Postgres, and NTP when you add the services to your Edge Node. (Refer to Edge services.)
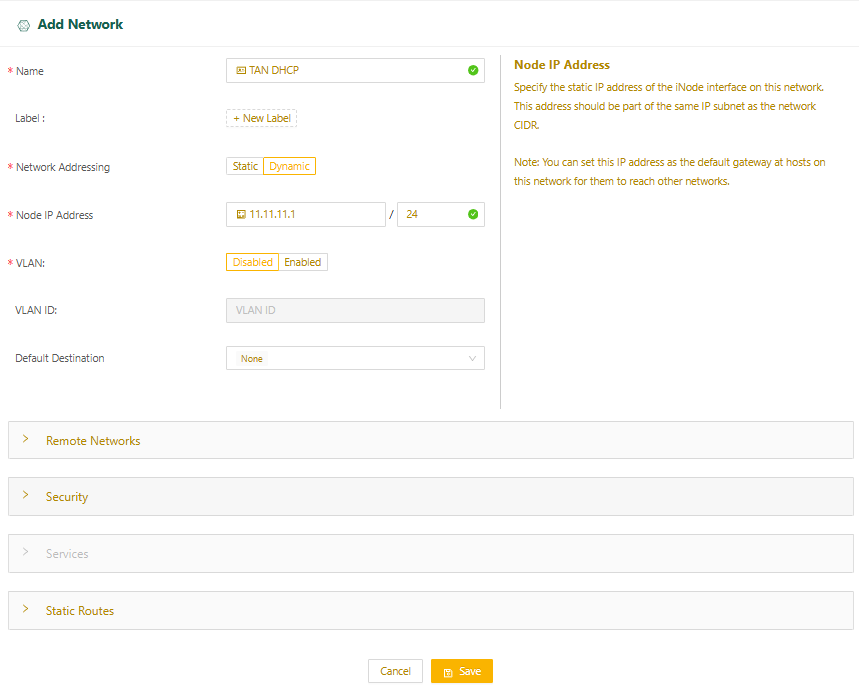
- Select Save and continue to Complete Network Setup.
Complete network setup
Follow these steps steps to complete the local network setup:
- You may have the option of configuring VLANs. (For more on VLANs, see Using VLANs on Edge Nodes.)
- Set the Default Destination for traffic from the local network with an outside destination (for example, traffic going to the internet or LAN):
- None: (default) Drops the traffic
- Specify IP Address: Sends the traffic to the IP address of a gateway in the local network that you specify
- WAN Network: Sends the traffic through the Edge Node uplink
- Select Save.
Create static routes for an Edge Node
Create static routes to enable services on the Edge Node to reach specific network segments or allow local hosts to access LAN or internet destinations.
- In the Static Routes expansion panel, select Add to add a new static route. You can add up to 64 static routes per network. Note that if you set Default Destination to a value other than None, it uses up a static route.
.png)
- Define the destination network's CIDR.
- Under Via, specify the traffic path:
- Specify IP Address: Sends the traffic to the IP address of a gateway in the local network that you specify
- WAN Network: Sends the traffic through the Edge Node uplink
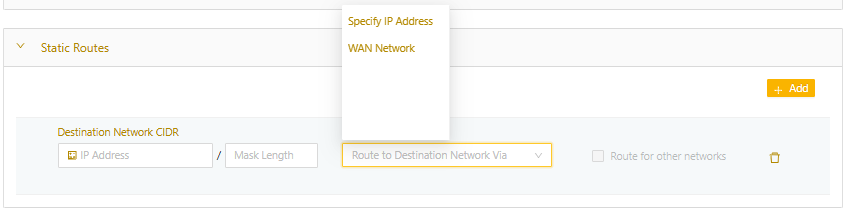
- If you need devices on this segmented network to be accessible via Remote Access or Cloud Connectors, select the Allow Remote Networks checkbox
- In the expanded section, select the remote network you would like to map the segmented network to.
- You can also specify a Representational Network value or select Enable Representation Network Automation to assign the NAT for you.
- You can add 25 remote networks per route.

- Select Save.
Launching an Edge Node
- Power on the Edge Node hardware. It will automatically discover the uplink network via DHCP and securely connect to Secure Edge Portal.
- If you want to configure the uplink interface to use static IP, please refer to the Node CLI.
- Verify the Edge Node status in the Secure Edge Portal; it should display as ALIVE on the Details page.
Managing unassigned serial numbers
For resellers, partners, or environments with child organization, manage unassigned serial numbers by moving them into the relevant child organizations.
- From the Secure Edge Portal left menu under Node, select Serial Numbers.
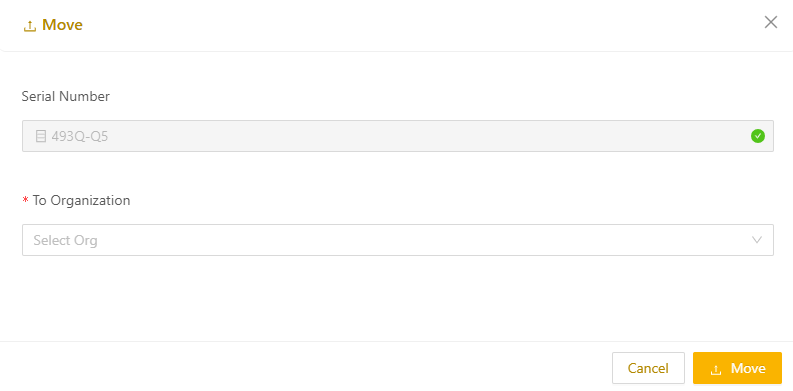
- Select the serial number, and then select Move from the top-right menu.
.png)
- In the To Organization drop-down field, select the destination child organization you would like to move the Edge Node to.